How To Publish Websites with Sophos UTM Web Server Protection
by


Etienne Liebetrau
Publishing an internal website securely to the Internet goes by a number of names such as Reverse Proxy, Web Application Proxy (WAP) and Web Application Firewall (WAF). Sophos UTM refers to this functionality as Web Server Protection.
In this article, I will take you through the steps of publishing an internal website (using the Fastvue Sophos Reporter application as the example web app) using the Sophos UTM Web Server Protection feature.
To ensure the implementation goes smoothly, the following steps should be performed in order:
- Register a public DNS record (Optional)
- Add an additional IP address
- Define a Real Webserver
- Create a Virtual Server
- Secure with HTTPS
1. Register a public DNS record
Since registering a domain (if needed) and propagating DNS records can take some time, you should start here.
You will need to create an A record pointing to the public IP address you will be using. The name is important to know before you proceed because it will be specified as an allowed domain when securing your virtual server, and it will also be used in the SSL certificate.
It is however possible to complete these steps using the IP address only, which may be suitable if you are just testing before going live with a public name.
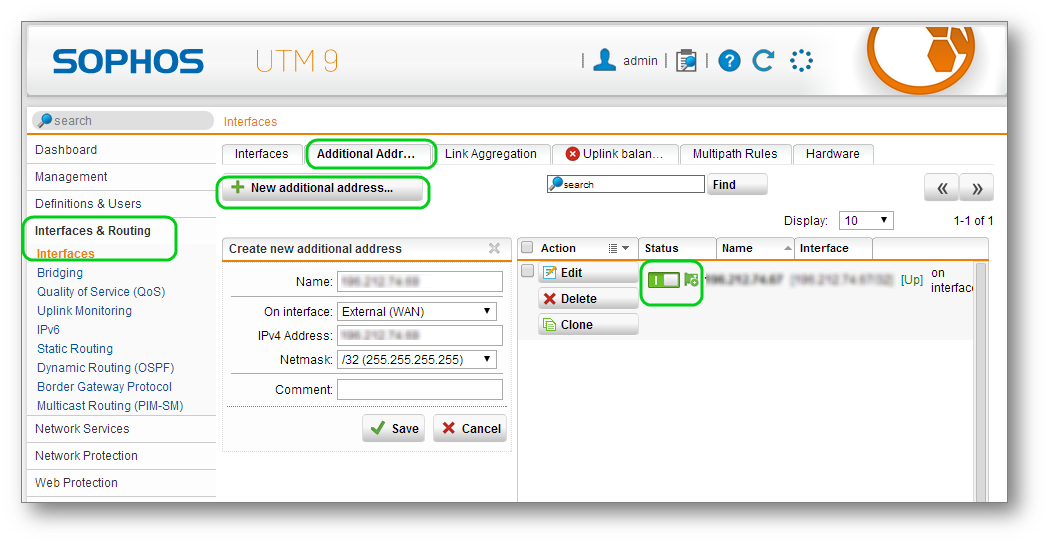
2. Add an additional IP address
Multiple public IP addresses are a great way to separate discreet services on the UTM, and you will need to add an additional interface for the Web Server Protection feature.
To add an additional IP address:
- Select Interfaces and Routing | Interfaces
- Select the Additional Addresses Tab
- Click the + New additional address... button
- Specify a name for the address (I use the IP out of habit but you can call it anything you like)
- Select the interface (WAN)
- Specify the actual IP address
- Select the netmask of /32
- Click Save
- After the address is added, it is in an off state by default. You will have to enable it by clicking the toggle switch.

By default, other services such as SSL VPN and User Portal use the ANY network as the IP address on which they are available. In this context, ANY refers to all IP address assigned to the Sophos UTM.
To prevent your newly created IP address from being claimed by these other services using the ANY interface, make sure the other services have been configured with specific addresses.
For example, one conflicting service you may run into is the SSL VPN. Here is how to resolve the potential conflict:
- Go to Remote Access | SSL | Settings. You will see that the interface address is ANY by default
- Click the folder icon next to the Interface Address field.
- Select and drag the External (WAN) (Address ) into the Interface Address field.

3. Define a real webserver
The real web server is your actual internal web server's IP address that is bound to the web site you want to publish.
This is where the Sophos UTM will send traffic after it is received from the Internet. In our example it is our Sophos Reporter web server.
- Go to Webserver Protection | Web Application Firewall | Real Webservers
- Click the +New Real Webserver button
- Specify a name for the Webserver (such as fastvue01)
- Click + icon to define the host
- Specify the name of the server, set Type as Host, and enter the IP address. Click Save
- Back on the Real Webserver configuration, select Type: Plaintext (HTTP), and enter Port: 80
- Click Save

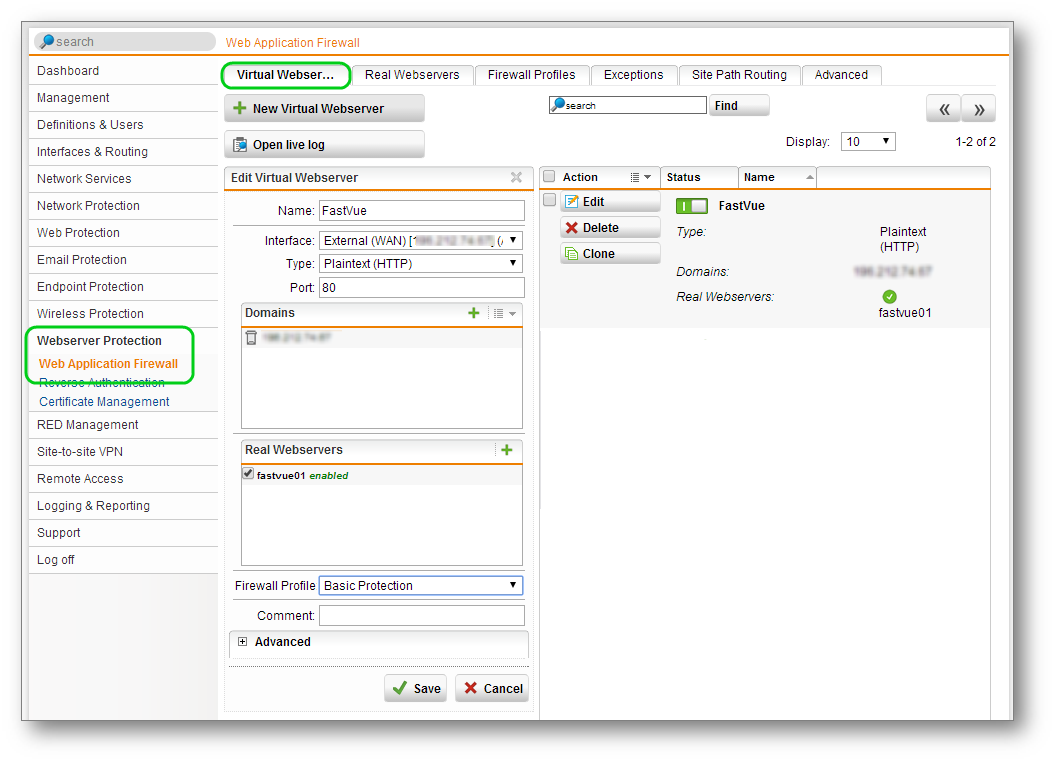
4. Create a Virtual Webserver
Next you need to define the Virtual Webserver. This will be the external facing IP address available from the Internet.
- Go to Webserver Protection | Web Application Firewall | Virtual Webserver
- Click the + New Virtual Webserver button
- Specify a name for the Virtual Webserver, such as Fastvue.
- Interface: Select the new IP address we created earlier
- Type: Plaintext
- Port: 80
- Domains: Click the + icon and add the public IP address (for testing)
- Click + again and specify the FQN name for the public DNS record created in step 1.
- The real web server should contain the server created earlier. Check the box to enable it.
- Firewall Profile: Basic Protection
- Click the Save Button
This completes the process of publishing the server with HTTP.
To test, click the Open Live Log button. This will open the log so that you can track access to the virtual server. From an Internet connected machine, enter the public IP address into your browser. The internal website should load in the browser, and you should see the log the events in the Live Log.
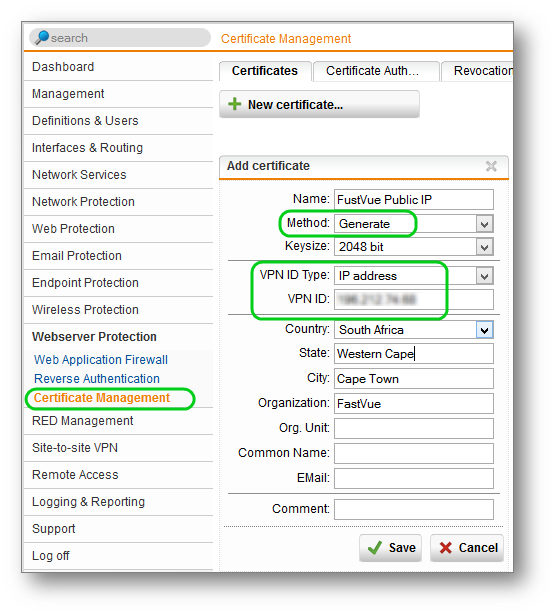
5. Securing with HTTPS
The next step would be to secure the site using HTTPS. A typical example of this would be to perform SSL offloading where web traffic over the Internet is encrypted, but not encrypted on the internal network. This means that the Fastvue Sophos Reporter server does not carry the overhead of performing SSL encryption. Instead this is performed by the UTM.
This means that traffic on the internal trusted network is not encrypted, but traffic leaving the Sophos UTM to the internet is encrypted. The tricky part, as always with SSL, is certificates. For the sake of simplicity I am going to step through generating a self signed certificate that is valid for the external IP address.
- Go to Webserver Protection | Certificate Management
- Click the + New Certificate Button
- Specify a Name for the Certificate
- Method: Generate
- Keysize: 2048 Bits
- VPN ID Type: IP address
- VPN ID: Specify the public IP address
- Enter your Address and Organisation details.
- Click the Save button.
Next, we are going to convert the existing plain text HTTP Virtual Webserver to an Encrypted HTTPS Virtual Webserver.
- Select Webserver Protection | Web Application Firewall | Virtual Webserver
- Select the virtual server created earlier
- Change the Type to Encrypted (HTTPS)
- Check the 'Redirect HTTP to HTTPS' checkbox
- Certificate: Select the certificate created earlier
- You should notice the domain is populated and cannot be edited as this value is retrieved from the certificate
- Click the Save button.
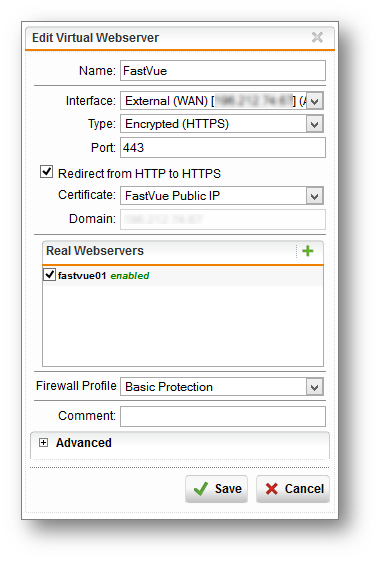
You have now converted your virtual server from HTTP to HTTPS. The Redirect HTTP to HTTPS checkbox means that the Sophos UTM will still listen on port 80 but it will send the browser a 302 redirect to ensure the traffic is always bumped up to HTTPS.
To test, open a browser and connect to http://thepublicip/. You should observe the URL in the address bar changing to HTTPS.
Conclusion
You have now securely published your internal Fastvue Sophos Reporter application to the public Internet using Sophos UTM's Web Server Protection.
Beyond this guide, you should create and use an SSL certificate that contains the correct public DNS name. Since this is public, I generally always recommend using a 3rd party certificate from a public certificate authority. This prevents certificate warnings on external devices.
I also encourage you to experiment with the different firewall profiles that Sophos UTM offers aside from the 'Basic Protection' profile we selected in the above steps, as well as the Reverse Authentication feature introduced in Sophos UTM 9.2. This is useful for sites such that require corporate authentication details such as SharePoint, Outlook Web Access, and even Sophos Reporter when using Windows Authentication in IIS.
I hope this helps anyone looking to configure Web Server Protection in Sophos UTM. Please let me know how you go in the comments!
Take Fastvue Reporter for a test drive
Download our FREE 14-day trial, or schedule a demo and we'll show you how it works.
- Share this storyfacebooktwitterlinkedIn
Replacing Forefront TMG with Sophos UTM (Webcast)
How To Remove False Positives in Sophos UTM's Web Application Firewall