Sophos STAS Authentication Step by Step
by


Etienne Liebetrau
Sophos STAS authentication, (Sophos Transparent Authentication Suite) is a collection of tools that provides a method of authentication that was introduced in UTM 9.4. This authentication mechanism has been lacking from the UTM, compared with some of its contemporary NGFW / UTM competitors. Sophos UTM now supports more authentication mechanisms than most others.
Sophos STAS authentication works by monitoring of the domain controller's event to correlate authenticated users with their associated IP addresses. The Sophos UTM then knows the identity of the user, and can apply access based on the user.
Sophos STAS Authentication - Basic Concepts
Sophos STAS Authentication works like this:
- Each domain controller tracks user log-in and log-out events.
- The Sophos STAS Agent collects these events from your domain controller and forwards them to the Sophos STAS Collector.
- The Sophos STAS Collector consolidates the events and forwards the username and associated IP address to the Sophos UTM.
- The Sophos UTM queries Active Directory to establish the User's group membership.
- The Sophos UTM then allows or denies traffic based on the user's permissions.
- The Sophos STAS Collector can be set to periodically check the workstation to validate that the user is still logged in on the identified device.
In theory, this is every domain controller in your environment. In practice, this is each domain controller that would service client authentication requests.
In a large environment with multiple AD sites, you would probably only require the STA Agents on sites associated with your end user subnets.
The STA Agent is either installed on a domain controller (EventLog mode) or another server (NetApi mode). In a small environment such as our lab, you can deploy the STAS Agent and STAS Collector roles on the domain controller itself.
Because there is no Agent required on the client, it is called agent-less authentication. "Domain controller monitoring Agent and no client agent" is way more accurate, but a bit too wordy for sales pitches.
How To Configure Sophos STAS Authentication - Step-by-Step
In this step-by-step guide, I will go through deploying Sophos STAS in a simple test lab environment that you would probably want to duplicate before deploying this into your production environment.
The lab contains:
- A single Windows server 2016 domain controller
- A Windows 10 Client that is domain joined
- A Virtual Sophos UTM
Step 1. Install the Sophos STAS Agent
The following is performed on the domain controller(s) in your environments. Or each STAS Agent server.
Ensure port 5566 is allowed, by adding a firewall rule with the following PowerShell command:
New-NetFirewallRule –Display "STAS Agent" -Direction Outbound –RemotePort 5566 –Protocol TCP –Action Allow
Next, you need to grant the account with Run as a Service rights. To do this:
- Open MMC and add the Group Policy Manager Snap-in.
- Edit a suitable policy or define a new one.
- Add the user to the following policy object.
- Go to Computer Configuration |Policies | Windows Settings | Security Settings | Local Policies | User Rights Assignment | Log on as a Service.
- Execute a Group Policy update.

You are now ready to install the Sophos STAS Agent:
-
Download Sophos STAS from https://www.sophos.com/en-us/support/utm-downloads.aspx
-
Run the installer, and accept all the defaults.
-
At the Type of Setup Screen page, select STA Agent. (If you are installing the collector and agent on the same machine select the SSO Suite option). Click Next.
-
Specify the account that is to be used. It must have administrative permissions on the server.
-
From the start menu Launch Sophos Transparent Authentication Suite.
-
In the General tab complete the information for the Monitored Domains.

-
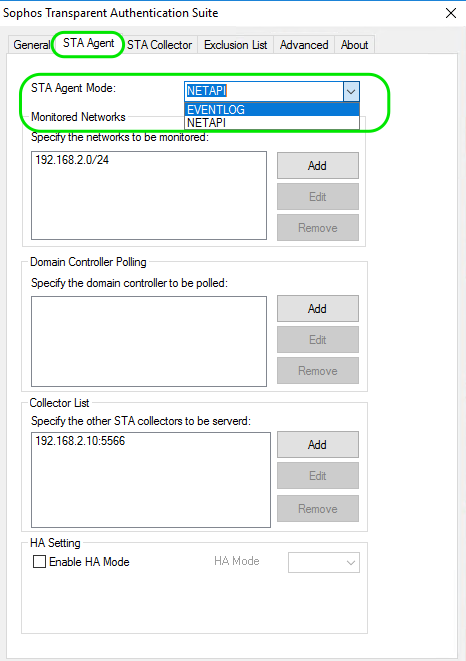
In the STA Agent tab specify the network subnets to be monitored.
-
Specify the IP address of the device that will be the STA collector:
- If you are installing on a domain controller the Agent Mode is EVENTLOG. If this is installed on the domain controller it has to be an administrator. NOTE: If this is installed on the domain controller it is effectively a domain admin service account.
- If you are installing on a non-domain controller the Agent Mode is NETAPI. In this case you will also have to specify the hostnames of the domain controller(s). In this mode you also have the option to set up the Agent in HA mode.

-
Once this has been completed, start the Agent service from the General tab.
-
Click Finish.
Step 2. STA Collector
The following needs to be completed on all of the devices that will act as collectors.
Use the two PowerShell commands to set up the required firewall rules.
New-NetFirewallRule –Display "STAS Agent Inbound" -Direction Inbound –LocalPort 5566 –Protocol TCP –Action Allow
New-NetFirewallRule –Display "STAS Collector" -Direction Outbound –RemotePort 6677 –Protocol UDP –Action Allow
Next up you need to grant the account Run as a Service rights.
- Open the MMC and add the Group Policy Manager Snap in.
- Edit a suitable policy or define a new one.
- Add the user to the following policy object.
- Go to Computer Configuration | Policies | Windows Settings | Security Settings | Local Policies | User Rights Assignment | Log on as a Service.
- Execute a GP update.
You are now ready to install and configure the STA Collector:
- Run the Downloaded STAS installer and accept all the defaults.
- At the Type of Setup Screen select the STA Agent Option, Next.
- Specify the account that is the be used. It must have administrative permissions on the server, Finish.
- From the start menu Launch Sophos Transparent Authentication Suite.
- On the General tab complete the information for the Monitored Domains.
- On the STA Collector Tab specify the UTM Appliance IP address.
- Accept the rest of the defaults for now*.
- On the General tab, you can now start the service.
NOTE: If this is installed on the domain controller it is effectively a domain admin service account.

* You would want to adjust the logout settings accordingly once you have established that everything is working as expected.
Step 3. Active Directory Configuration
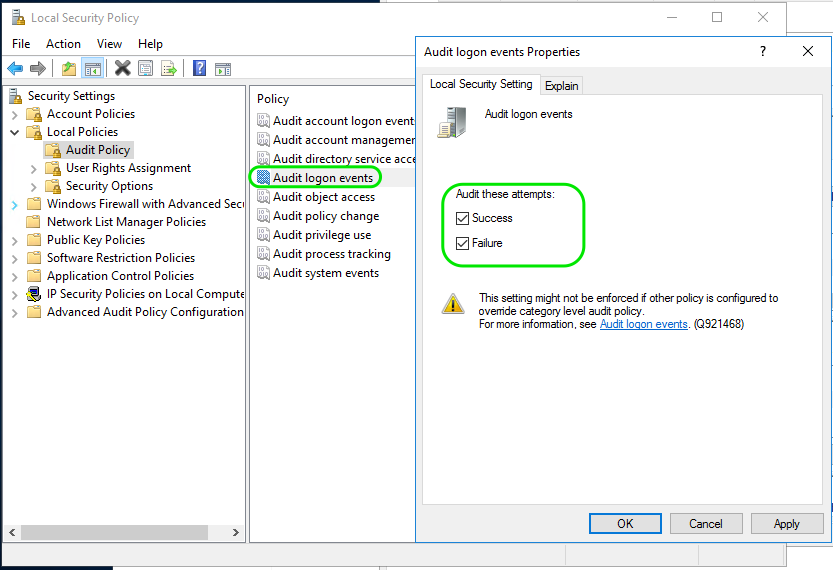
As mentioned earlier, the whole process works based on the domain controller logging the log in and log out events. The following settings ensure that these events are actually logged on the domain controller.
This procedure must be configured on all the of "Monitored Domain Controllers", or domain controllers on which the STA Agent is installed.
- Open the local security Policy by running secpol.msc.
- Navigate to Local Policies | Audit Policies | Audit Logon Events.
- Check both Success and Failure, OK.
Step 4. UTM Configuration
The UTM will take the user information it receives from the STA collector and check it against Active Directory for Group Membership.
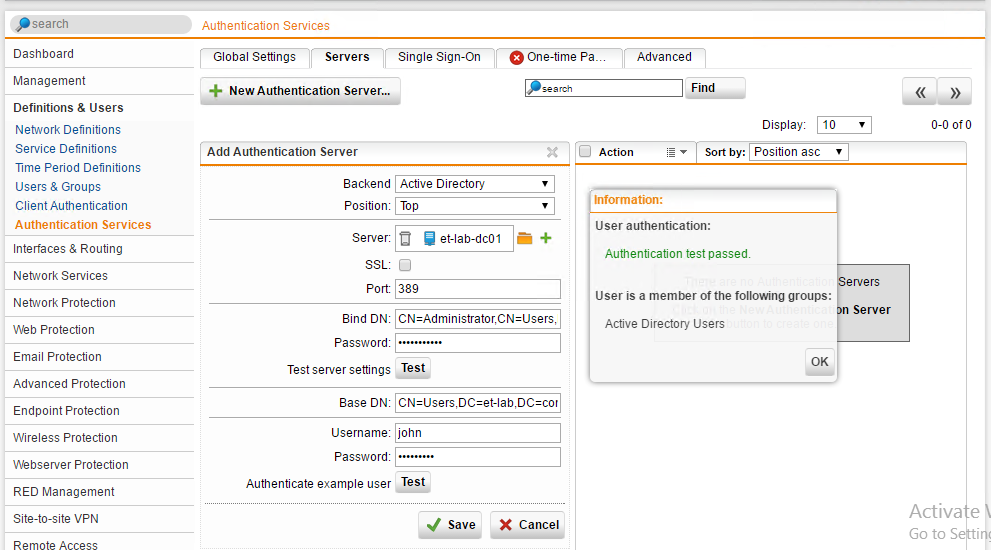
Add your domain controller(s) as Authentication Servers:
- Go to Definitions & Users | Authentication Services | Servers | + New Authentication Server
- Make sure you get a Successful test
Next up we will configure the UTM to use STAS:
- Go to Definitions & Users | Client Authentication | Sophos Trans... Tab.
- Toggle to Enable the service.
- Add a new Stat Collector.
- Make sure that the server object you specify has an interface specified in the advanced section.

Step 5. Client Configuration
The following only needs to be configured if you want to validate the logged in user. This portion is not required, but I would suggest you configure it if possible.
There are two methods that can be used. WMI verification or Registry Read.
Both methods require the associated services to be running on the client, so set them to Auto Start, and start them.
For WMI
- Remote Procedure Call (RPC)
- Remote Procedure Call (RPC) Locator
For Registry Read
- Remote Registry
Since these are sensitive services you would also need to explicitly allow the communications through the Windows firewall.
I found the only reliable way to enable this was to set a broad inbound rule from the STA Collector with the following PowerShell command
New-Netfirewall –DisplayName "STAT Collector" -Direction inbound –RemoteAddress 192.168.2.10
Step 6. Verification
Now we are ready to check that everything is working as expected.
From the Start menu, open the Sophos Transparent Application Suite, and select the Advanced tab.
Use the troubleshooting section to test each function:
- WMI verification (Default)
- Registry Read Verification (if configured)
- Sophos – your UTM
- Agent
- Collector
If you have a successful test on all items that apply you are ready to start some real world testing. You may already have some detected live users, you can see these by clicking the Show Live Users button. You can check here to verify if the UTM is receiving what it should be.

Step 7. Testing
You should now be able to log onto a domain-joined device and the user information should make its way through to the UTM. On a domain-joined windows machine, log off and then back on again. Just locking and unlocking will not work.
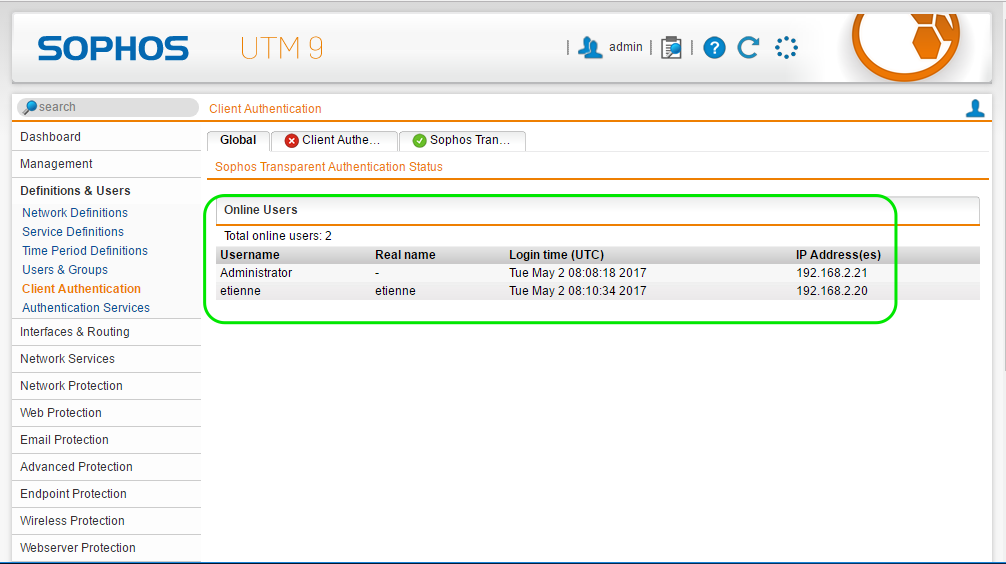
Next up we can check if those users are successfully sent to the UTM. You can see who is identified by checking the UTM management console:
- Go to Definitions & Users | Client Authentication | Global Tab.
- Looking at the Online Users it should match the entries from the STA Collector.
You can also check the User Authentication Daemon log (aua.log), and look for entries that contain caller="stas".
Limitations of the STAS
As we all know, security directly opposes convenience. That extra security gate you need to unlock is an inconvenience but it is worth it if the extra security means you get to keep your stuff. With STAS you would have noticed that the UTM does not actually authenticate the user, instead it trusts the domain controller to identify the user. Based on that identification the UTM then authorizes the access.
STAS is generally effective and efficient for some environments, but it (and similar transparent authentication methods from any other vendor) can be easily defeated.
A really simple scenario:
A user logs on to their workstation, and is identified and logged as an online user by the UTM. An action is required by the operating system the require UAC and someone with administrative access needs to allow the action. Once the action is completed the admin goes away and the user keeps on working. What happens in the background is that the administrator has completed a successful authentication on the client IP address. As far as AD and STAS are concerned, the IP now belongs to the administrator. The user the lock their workstation and unlocks it for the next few days. After all, why log off or reboot the machine. For the entire duration before an actual log on event happens, all traffic from that IP would be reported as the administrator, and not the user.
Another scenario where this does not work is when you have a terminal server environment such as Citrix or RDS. Multiple users log on to the same IP address. The latest logged on user would be the only one that shows up on the UTM. The same condition exists when user switching is enabled on a Windows Client OS.
If client devices go through a NAT before they reach the UTM the client will not be identified as the client NAT IP and the AD log IP would be different.
If a user authenticates against a service like a website, the user's identity will then move to be the web server's IP address and no longer the client's. Exclusions would have to be set for instances like this.
STAS and User Network Objects
One handy feature of STAS is that it enables you to create firewall rules pertaining to users in the form of User Network objects. This means that the rule will apply to which ever IP addresses is associated to that user.

The problem is it's hard to see if it's actually working.

STAS and Reporting
Since STAS is only one of many methods for identifying the user to the UTM, STAS itself does not impact how the username is represented in the logs. One thing it will assist with though is allowing the username to show up even if no authentication is requested. Normally, if a web profile does not require authentication, and the username is unknown, the IP would be used. However, with STAS the user might be populated independently of the Web Protection authentication requirements.
User Web protection will, therefore, be even more complete when it comes to reporting anonymous access in tools such as Fastvue Sophos Reporter or Webspy Vantage.
User Network firewall rules are another matter. The only way to verify that the above three rules were working, was to connect from those three network locations and watch the packetfilter.log to see which rule was rejecting the traffic. Of course, it worked. But unless you are looking for the rule number, the username or network object never shows up in the log.
Conclusion
We have seen that Sophos STAS authentication is a very convenient way to identify users, but it is identification only. Since the identification method is easily confused, it is really not suitable for a dynamic, high-security deployment.
The great news, however, is that the UTM platforms support numerous authentication methods that actually authenticates users. These include Agent, AD SSO and Browsers that make use of Kerberos to properly identify, authenticate and authorize access.
Take Fastvue Reporter for a test drive
Download our FREE 14-day trial, or schedule a demo and we'll show you how it works.
- Share this storyfacebooktwitterlinkedIn
How Digital Monitoring for Schools Helps Protect Students Online (2025 Update)
How to Enable Dark Mode in Fortinet FortiGate (FortiOS 7.0)