Recategorizing Websites in Sophos XG and Reclassifying Productivity
by


Etienne Liebetrau
A frequently requested feature of the Sophos XG product is the ability to recategorize a website from the default category to another. At this time, it is not possible to re-assign a site from one category to another, but you can create custom categories and use those instead.
You can use custom categories not only for recategorizing websites in Sophos XG, but also for allowing or denying access to specific sites for certain users. They can also be used to reclassify the browsing 'productivity' for certain users when viewing Internet usage reports in Fastvue Sophos Reporter. For example, you can use them to classify lingerie sites as 'productive' for people in a retail lingerie department or to classify social media sites as 'productive' for people in the marketing department.
There are a couple of "gotchas" in doing this, and I will explain how to avoid them while taking you through the process.
For this article, assume we are a retail chain that sells swimwear and lingerie.
- We want to allow users to access swimwear sites if they work in the swimwear department.
- We want to allow users to access lingerie sites if they work in the lingerie department.
- We do not want to allow other users to access those sites.
- We want to have reports reflecting lingerie and swimwear browsing as productive for the relevant departments.
Step 1. Finding a Website's Current URL Category
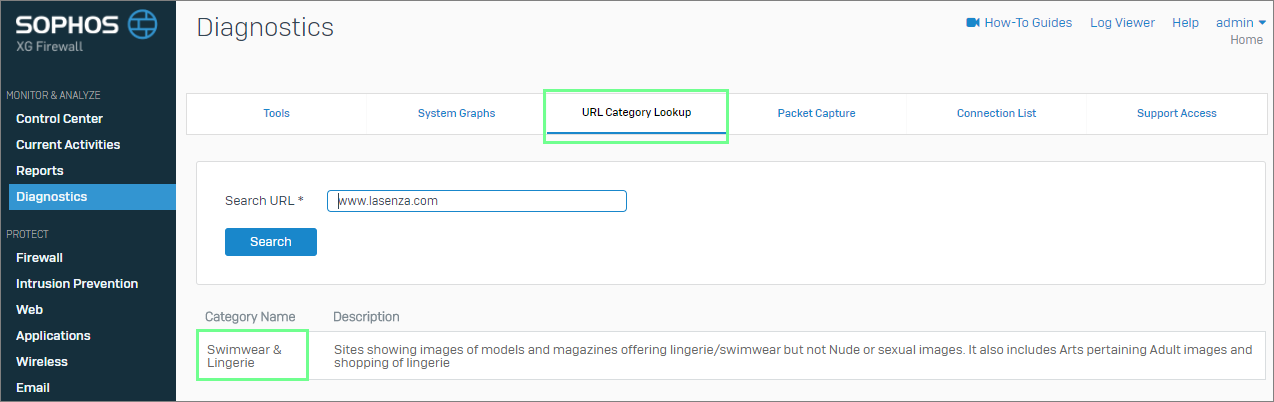
To figure out where sites are categorized by default, we use the URL Category Lookup tool.
- Navigate to Monitor & Analyze | Diagnostics | URL Category Lookup
- Enter the site name e.g. www.bakuswimwear.com.au
- Click Search
Here are some example sites and the URL category they return using the URL Category Lookup tool.
- www.bakuswimwear.com.au - General Business
- www.beachbunnyswimwear.com - Swimwear & Lingerie
- www.sunburnswimwear.com.au - Online Shopping
- www.victoriassecret.com - Swimwear & Lingerie
- www.lasenza.com - Swimwear & Lingerie
The default categorization is clearly not going to work for us. Swimwear is mis-categorized twice (once as General Business, and once as Online Shopping), and when these sites are correctly identified, Swimwear and Lingerie are grouped together, rather than two separate categories. We therefore need to recategorize these websites in Sophos XG.
Step 2. Create Custom URL Categories in Sophos XG
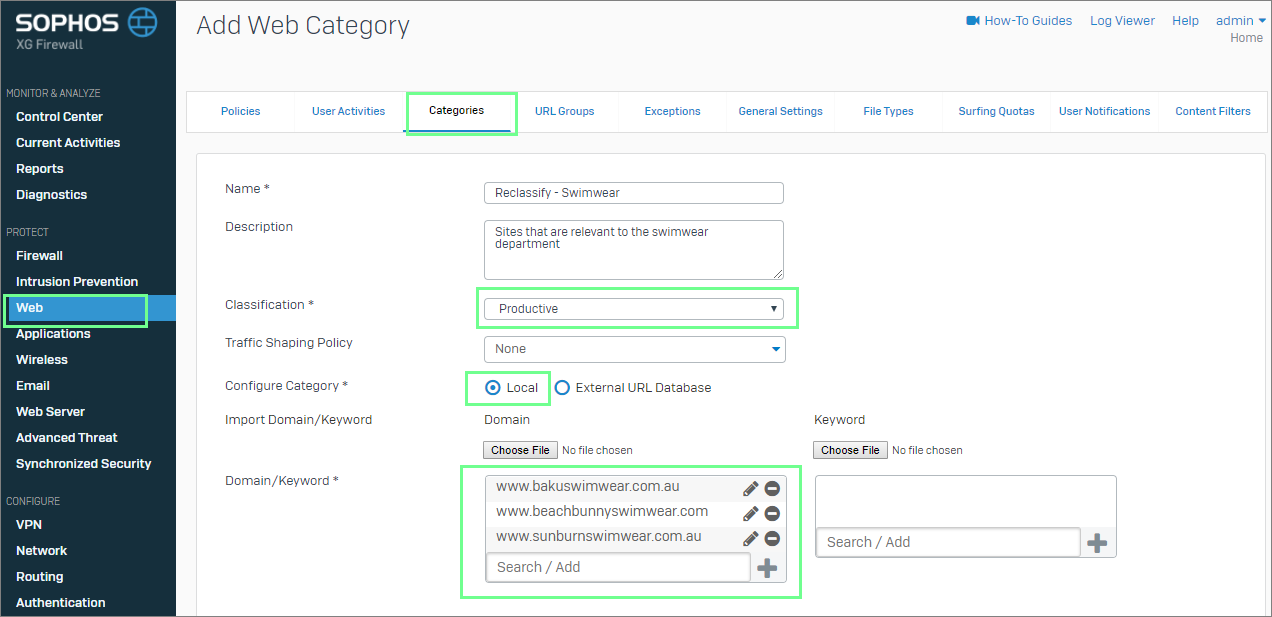
As mentioned, recategorizing websites in Sophos XG is done using by creating custom URL categories:
- Navigate to Protect | Web | Categories
- Click Add and specify a Name and Description. Tip: You may like to use a naming convention such as Reclassify - [Category Name] so that you know this is one of your custom categories when viewing reports.
- Set the Classification to Productive
- Configuration Category is Local
- Add the relevant domain and click +. Repeat until all the sites are added.
Step 3. Verify the Custom URL Category is Working
Let's check that the new categories are being recognized using the URL Category Lookup tool:
- Navigate to Monitor & Analyze | Diagnostics | URL Category Lookup
- Enter the site name e.g. www.victoriassecret.com
- Click Search

You can now see that two categories show up. The top one is the custom URL Category and the bottom one is the default URL Category.
Now let's check the firewall policy.
- From the top of the screen click Log Viewer | Policy Test
- Again, enter www.victoriassecret.com as the test URL
- Select Test Firewall Policy as the Test Method.
- Specify a suitable Source IP from the internal network
- Click Test

We can see that the site is still being blocked based on the default URL category in the web policy. It is as if the new custom URL Category is not being recognized.
Let's repeat the test but this time, let's use the Test Web Policy method**.**
- Again, enter www.victoriassecret.com as the test URL
- Select the Test Web Policy Test Method
- Specify a suitable Source IP from the internal network
- Select the web policy you expect to be applied
- Click Test

We can see that the site is still being blocked based on the default URL category in the web policy.
Let's repeat the test again, but this time we'll test the Allow All Web Policy.
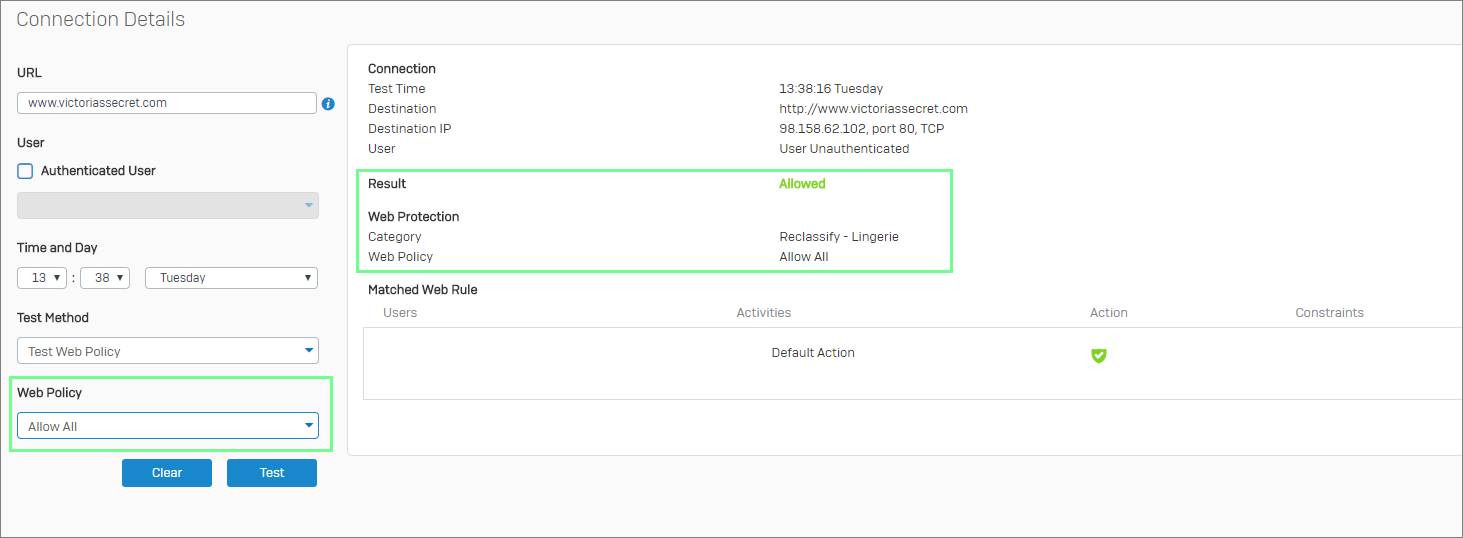
In this case, you can see that it will be allowed, and more importantly that the category is now picking up the custom URL Category we defined in Sophos XG.
Step 4. Alter the Sophos XG Web Policy to Allow the Custom Category
As we can see from the tests, the web policies are still blocking the site based on the default URL category. To fix this we need to edit the relevant rules in the web policies to allow the custom URL category, but only for the users that need to access those sites.
- Navigate to Protect | Web | Policies.
- Expand the policy that is blocking the original web categories.
- Click the + and Add a Rule Above.
- Change the Users column to "Lingerie Department".
- In the Activities column, remove All Web Traffic and click Add New. Click Show Only and select Web Categories, then check the checkbox next to your custom URL category (in my example it is called Reclassify - Lingerie). Click Apply.
- Change the Action to Allow.
- Repeat the steps 3 to 5 to allow the Swimwear department to the custom URL category for the swimwear sites.
- Turn on both rules with the toggle switch.
- Click Apply Changes at the bottom of the screen.

It is important to add the rules above the deny action. If it is below, the default URL categorization will be applied and the site will be blocked.
Step 5. Test the Sophos XG Web Policy Changes
Let's repeat the policy tests for www.victoriassecret.com:
- If we repeat the Firewall Policy test we can see that the site is still blocked.
- If we repeat the Web Policy test for everyone it is still blocked
- If we repeat the Web Policy test for users in the lingerie department, it is allowed, and the same for swimwear.

Success.
Step 6. Update Fastvue Sophos Reporter's Productivity Classification
The last step is to add our custom URL categories into the correct productivity list in Fastvue Sophos Reporter.
Once some traffic has passed to the sites in question, the custom URL categories will show up in Fastvue Sophos Reporter's Unassigned Productivity list.
- In Fastvue Sophos Reporter, go to Settings | Productivity
- Drag your custom URL categories from the Unassigned list to the Productive list.
- Click Save Productivity Settings in the top right.
Now when users in the Lingerie or Swimwear departments browse lingerie or swimwear websites, no longer will Fastvue Reporter show their browsing in the Unproductive or Unacceptable browsing reports or alerts!
You can follow the same process to allow your Marketing department to Social Media websites and classify their browsing as productive.

Conclusion
Recategorizing websites in Sophos XG is relatively simple. You can use this method to allow or deny access to certain websites for specific users, and change the productivity of those sites in Fastvue Sophos Reporter when the allowed users access those sites. Using categories instead of URL groups keeps productivity reporting simple.
Meanwhile, browsing by other users to swimwear and lingerie websites will still be categorized as the default 'Swimwear and Lingerie' category, and their browsing will be reported as Unproductive in Fastvue Sophos Reporter.
Haven't tried Fastvue Sophos Reporter yet? Download the free 30-day.
Take Fastvue Reporter for a test drive
Download our FREE 14-day trial, or schedule a demo and we'll show you how it works.
- Share this storyfacebooktwitterlinkedIn
Sophos XG Reporting Now Available in Fastvue Sophos Reporter!
How Digital Monitoring for Schools Helps Protect Students Online (2025 Update)