How to Build a Sophos UTM High Availability (HA) Cluster in Hyper-V
by


Etienne Liebetrau
Deploying Sophos UTM in a High Availability pair allows for continuous uptime of the Sophos UTM services in the event that one of the UTM nodes fails.
Failures can occur due to hardware or system crashes on the UTM, or in a virtual environment the failure can occur on the hypervisor host itself. A common example of this is routine periodic patch cycles that require a reboot of the host.
Sophos UTM High Availability Options
You can configure Sophos UTM to operate in one of two High Availability modes:
Cluster (Active – Active) In this mode, both nodes are actively handling traffic. This mode allows for increased throughput in your UTM environment since all nodes are doing their share of the workload.
Hot Standby (Active-Passive) In this mode you have a primary or master node that is handling all of the traffic. The other node is ready and waiting to take over should the master fail. This mode allows for high availability but without the performance gain.
Due to the way Sophos UTM is licensed, this is a very attractive deployment since only the active node needs to be licensed. In a virtual deployment you don’t even need to purchase the UTM hardware. It is therefore almost a given that if you have enough virtual infrastructure you should be running an Active Passive pair.
You can change your deployment from Hot Standby to Cluster but you cannot change it back. You would need to perform a factory reset on the devices before you can break the cluster.
Building a Sophos UTM Hot Standby (Active Passive) Environment
In this article, I will take you through the steps to deploy Sophos UTM in Hot Standby mode using Hyper-V.
Preparing the virtual switch requirements
I am going to build the Active - Passive High Availability (HA) deployment over two hyper-V hosts. This is typical since the hardware failure of a single host should not affect both of your Sophos UTM virtual machines. This of course, means that all of the steps below need to be configured on both hyper-V hosts.
NOTE: Although it is possible to build a HA pair on a single Hyper-V host, it does not work 100% due to the way MAC spoofing is handled.
Sophos UTM has a minimum requirement of three network interfaces:
- Internal
- External
- Replica or heartbeat
Create three switches that correlate to the networks. All three switches are of the External Type.
I suggest using a crossover cable for the heartbeat network. It is rare for switch gear to fail but you don’t want a power outage on the switches to cause your HA cluster to start failing back and forth. The requirement is also for the replica to support broadcast UDP, which may not be enabled in your switch infrastructure.

Create a Sohpos UTM Virtual Machine on each host
Both virtual machines need to be identical from a network interface perspective so take extra care to make sure you get this right. Double check to ensure that the interfaces of the host itself do in fact bind to the desired network.
Attach the network adapters in order. This should ensure that they are identified as eth0, eth1 and eth2.
- Internal
- External
- Heartbeat
For each adapter, you also need to enable MAC address spoofing. This is so that they can spoof the virtual MAC addresses of the virtual IP's that are shared by the HA pair. To do this:
- Select the network adapter
- Select Advanced features
- Select Static MAC address
- Check Enable MAC address spoofing

For the rest of the hardware configuration you can specify the following:
- 2 x CPU
- 4GB of static RAM
- Single dynamic virtual HDD
- Attach your Sophos UTM build ISO to the virtual DVD
Building the Sophos UTM virtual machines
Start both Sophos UTM virtual machines and step through the normal build wizards. You can follow https://www.fastvue.co/sophos/blog/how-to-deploy-sophos-utm-on-hyper-v-in-7-simple-steps/ for details on each wizard page.
The most important step in this process is to ensure you use a unique IP when prompted to specify each UTM's internal interface. Each Sophos UTM must have its own unique management IP address.
Once the build is complete I suggest taking a virtual machine checkpoint/snapshot. If you need to rollback for any reason, this is the last time the VMs will be totally unique and separate from each other.
Configure the Sophos UTM virtual machines
We are just going to proceed with a basic setup of each Sophos UTM.
Once the Virtual Machines are joined in an HA pair the configuration will be automatically synced between the nodes. It is of course possible to add a HA node to an existing, fully configured, stand alone UTM. Just ensure you have local copies of the backups.
On each Sophos UTM Virtual Machine:
- Complete the Welcome Screen
- Accept the License agreement
- Click Perform basic system setup
The only difference between the Sophos UTM nodes should be the hostname.

After the initial build cycle, log back in and step through the initial set up wizard as set out below. Again, this will be the same on both nodes, with the exception of the Internal IP address.
- Click Continue
- Don’t Specify License at this stage
- Internal LAN should remain the same and should not require changing (it inherits the setting from the build stage)
- For the Internet WAN setting, check the "Setup Internet Connection Later" box
- Proceed through the rest of the wizard accepting all defaults
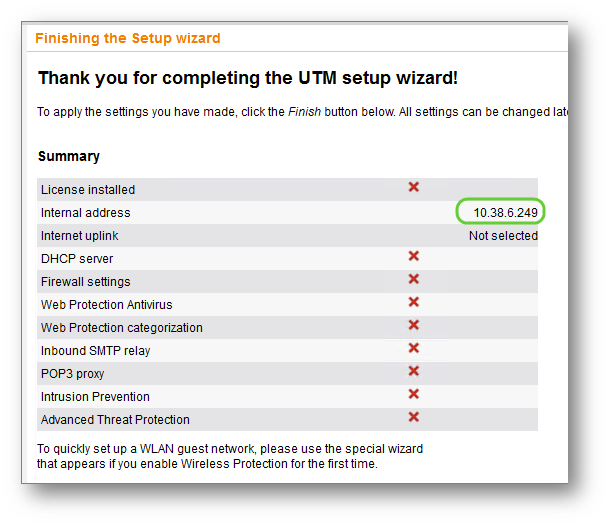
Your summary should look like this:
Configuring High Availability (HA) on Sophos UTM
Up to now you have configured two UTMs to be nearly identical. In this step you will merge the configuration on the two devices. The individual management addresses will fall away, one of them will be selected as the shared virtual IP that will be used from now on to manage the HA pair.
On both Sophos UTM Virtual Machines:
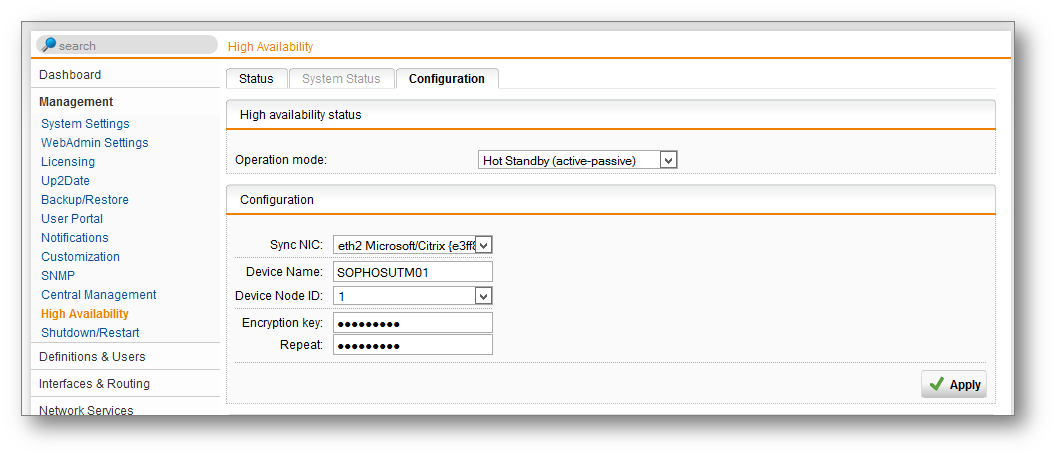
- Select Management | High Availability | Configuration Tab
- Operation Mode: Hot Standby (Active-Passive)
- Sync NIC: eth2 (the heartbeat adapter)
- Device Name : The name of the Node you are currently configuring
- Device node ID: 1 or 2 depending on the host (they must be different)
- Encryption key : A phrase or password to use for encryption. It has to match on both nodes. Another descriptive term would be "the shared secret."
- Click Apply
- Repeat on the second node
At this stage, the initial sync will be performed. This will cause you to be temporarily disconnected from the web interface.
The sync could take a while to complete, be patient. I set up continuous pings to the two management IP's. When one stops responding you know things are working away in the background. After a few minutes you will be able to log back into the web interface. You can check on the progress by selecting the Status tab from the Management | High Availability section.
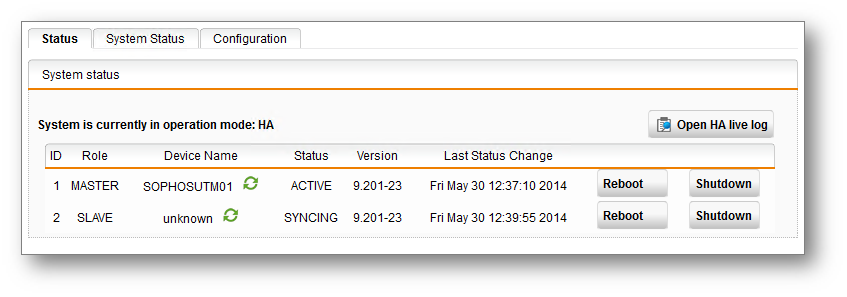 Once the two nodes are in sync, you will see the status change from SYNCING to READY. At this stage you have a working HA Active - Passive pair!
Managing the HA Pair can now be performed through the single management interface. All changes will automatically be replicated.
Now that the configuration is online, you can set the High Availability | Configuration | Advanced Settings.
- The preferred master is the node you want to prefer to always own the role.
- In the event of the cross over cable being accidentally unplugged, the backup interface setting will keep the nodes from erroneously failing over and fighting over the virtual IPs.

Testing
Testing the fail over is a simple process but it pays to do the due diligence here.
From the High Availability | Status tab, take turns to reboot each node member one at a time ensuring that the management IP does not go down during the switch over. A simple continuous ping is a great way to track it. In my testing I found that switching from one node to the other resulted in a single dropped ping.
When the nodes reboot you will notice an extra start up process for the High Availability modules. There is a built in check and you can see which interface is being used to listen to the heartbeat. This adds about 20 seconds or so to the initialising time, so it is easy to spot.
Troubleshooting (HA Live Log)
For troubleshooting, you can look at the HA live log. Although the log entries do indicate what is happening, they are not 100% clear or intuitive. It helps to understand what healthy log looks like, so when everything is running smoothly, make a copy of the log for future reference.
Conclusion
Sophos UTM is a great product that comes with quality features at a reasonable price point. From a licensing perspective, virtual deployments can essentially be upgraded to a Hot-Standby HA pair at no extra cost.
It is a relatively simple process with some significant advantages. You do not need your Sophos UTM to be installed on a Highly Available Virtual Machine with all the requirements that come with it. You simply run two standard virtual machines.
Being able to elect a preferred master also allows you to run your standby node on lesser hardware for those "in case" scenarios, knowing it will fail back to the preferred hardware when it is available.
I hope this helps anyone looking to deploy a Sophos UTM High Availability Hot Standby pair for the first time. Please let me know how you go in the comments!
Take Fastvue Reporter for a test drive
Download our FREE 14-day trial, or schedule a demo and we'll show you how it works.
- Share this storyfacebooktwitterlinkedIn
How to Deploy Sophos UTM on Hyper-V in 7 Simple Steps
How To Retrieve Log Files From a Sophos UTM Cluster Slave Node