How to Deploy Sophos UTM on Hyper-V in 7 Simple Steps
by


Etienne Liebetrau
Sophos UTM is very versatile when it comes to the deployment options available to you. You can purchase a physical hardware appliance, or deploy a virtual appliance on your own hardware, usually via VMWare or Hyper-V.
Ths guide takes you through all the steps necessary to Sophos UTM on Hyper-V.
Before you begin
The components you will need include:
- Physical machine with at least two physical network adapters or a similar multi-port adapter
- Internet connection such as DSL router or similar service from your ISP
- Windows Server 2012 R2
- Internal network using the 10.x.x.x range
Step 1 - Download Sophos UTM ISO
Start by downloading the Sophos UTM ISO image as this may take some time to complete, and you can perform step 2 below while you wait.
- Browse to https://www.sophos.com/en-us/products/free-tools/sophos-utm-home-edition.aspx
- Follow the download process and Sophos will email you a license key and grant you access to the downloads.
- You will need this key, in the form of a license file, to complete the setup.
Step 2 - Hyper-V configuration
This guide uses a Windows Server 2012 R2 host. The Hyper-V host is configured with two NICs. One will be patched directly into a DSL router. The other is patched into the internal corporate network.
Step 2.1 Configuring Host networking
Two virtual switches need to be created.
-
The Internet facing virtual switch is named External – Internet
-
The connection type is External and the relevant NIC is selected
-
This virtual switch is not checked to “Allow management operating system to share this network adapter”
-
The internal network facing virtual switch is named Internal - Corporate
-
The connection type is External and the relevant NIC is selected
-
This virtual switch is checked to “Allow management operating system to share this network adapter”

If you have a look at the Hyper-V hosts you should now see three adapters. Two network adapters that are the switches, and an additional adapter called "vEthernet" which is the host’s connection to the Internal – Corporate Switch.

Step 2.2 Creating the virtual Machine
The Sophos UTM appliance has very moderate minimum requirements from a CPU and RAM perspective. Because I have more resources available, I am going to create the virtual machine with the following specifications. I have found the UTM to perform smoothly with most options enabled with this specification:
- Generation 1 Virtual Machine
- 4 x CPU
- 4GB RAM Static
- HDD 127GB Dynamic
- Attached the downloaded Sophos UTM ISO from Step 1 above as a DVD Drive
- Configure TWO Network adapters:
- One Connected to the Internal – Corporate Switch
- One connected to the External – Internet Switch

Step 3 – UTM Installation
Start up the virtual machine and connect to it with the console. By default the VM will boot from the attached ISO (see step 2.2 above)
- Press Enter to start the installation

- Select Start

Make a note to ensure you know which eth (for Ethernet adapter) is associated with which Virtual Ethernet Card
- Select your keyboard layout (such as English USA)
- Select your Area
- Select your Timezone

Make sure these settings are correct in relation to your domain.
Select which interface you will use to access the Web admin user interface. This is normally your internal network
- Select eth0

- Specify the IP address details

- Select Yes to install with a 64Bit Kernel

- Select Yes to install the enterprise toolkit

- Confirm that the virtual disk can be partitioned
- Wait for the install to complete
Make a note of the IP address and Port as you will use this from your browser to access the Web Admin interface moving forward.

This completes the build section. If you are using a virtual machine this is a good place to take a snapshot or create a checkpoint.
Step 4 – Initial Configuration Wizard
You are now ready to start up your UTM for the first time. If you are still viewing this process from the console window you will see the following when the machine restarts. It simply show this white screen while it boots.

Pressing F2 will show you the boot up details.

If all the steps have been completed successfully, there should be no errors during start-up. In case you missed it, the web admin URL is listed at the bottom of the screen.
From now on you will stop using the console to work directly on the virtual machine. According to my source at Sophos, one of the UTM design goals is to never require an administrator to use anything other than the web interface.
Step 5 – Sophos UTMs Initial Configuration Wizard
Open your favourite browser and connect to the specified management URL.
- Specify the Hostname of the UTM
- Specify Company name
- City
- Country
- Admin password
- Admin email account

Note that the admin email account will be the default account used for notification from the UTM. It is a good idea to specify a notification email address especially if you are just doing a test or trial deployment.
- Check the “I accept the license agreement” check box
- Click Perform basic system setup
As part of the wizard you will be logged off
- Log in with your new credentials

- Select Continue with the wizard and click Next
- Check your mailbox for the attached license file from Sophos.
- Save it locally on your machine
- Click the folder icon and select the file
- Click Next

- Here you specify the internal IP address of the UTM device as well as the subnet.
Only if you do not already have DHCP enabled should you check the Enable DHCP server box.

Selecting the Internet Uplink will be determined by the kind of internet connection available. In this setup, I have a DSL connection with fixed public IP address.

I am starting with the just a basic web surfing configuration
- Check the Web check box
- Click Next
To make it easier to check that your UTM is up and running, enable the ping options. These can be turned off later.

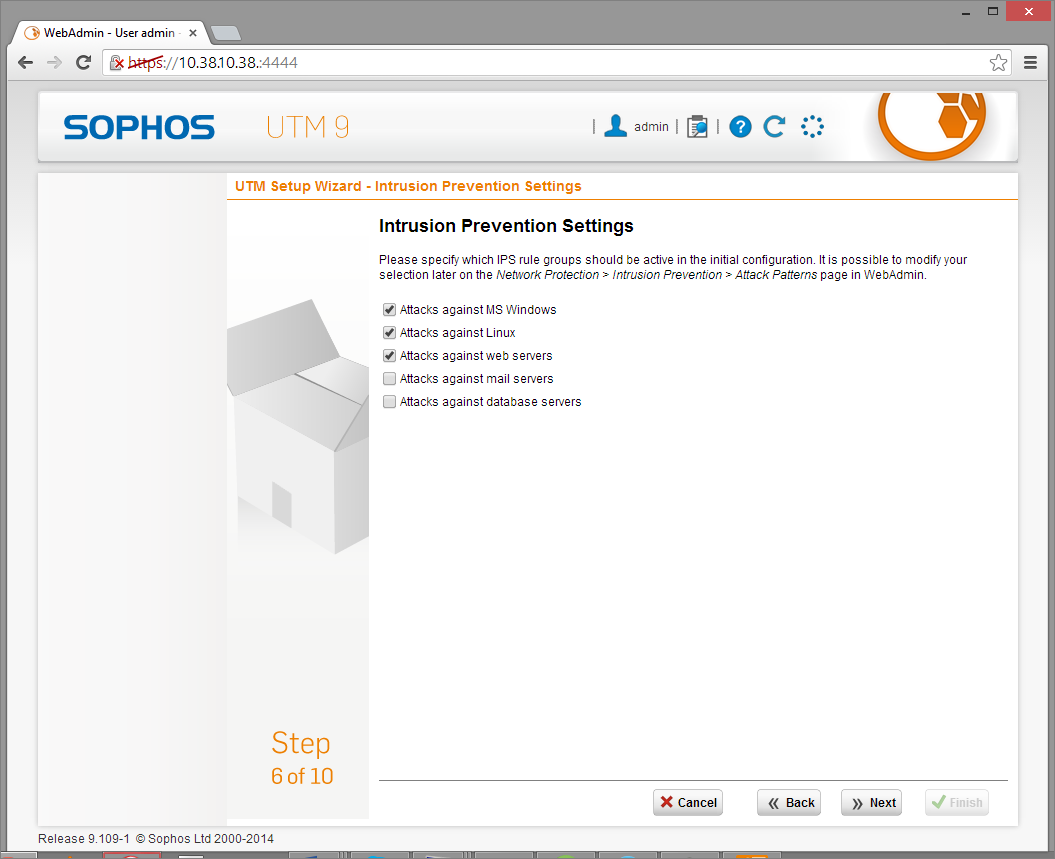
- For Intrusion Prevention, select the options relevant to your environment
- Click Next
- Enable Network Visibility
- Click Next

- Check the web categories you want to filter
- Click Next
It is a good idea to also filter additional categories to make it easier to test your deployment. You want to be able to access websites through the proxy but also know that it will filter URLs correctly. These can always be changed afterwards.

The summary will indicate the choices you have made
- Click Finish to complete this section.
Step 6 – Additional Post Deployment Steps
By this stage you should have a proxy that works fine for everything on its own internal subnet. If you have a small network deployment that only has one subnet you can skip this step.
Step 6.1 Create a static Route
To allow clients from other subnets to also be able to connect and use the proxy, you need to add a static route to all internal traffic correctly though the internal interface.
Routing basics: A machine can only have one default route. If the machine does not know where to route traffic, it will use that route. Since the UTM has two interfaces, one will be the default. This is always the external interface because it routes everything to the internet.
You therefore need to manually configure it to send any traffic destined for the internal network via the internal interface. Here’s how to do it:
- Select Interfaces & Routing
- Select Static Routing
- Click + New Static Route
- Route Type will be Gateway Route
- Click + next to Network to create a new network definition with the following settings:
- Name: Internal Corporate
- Type: Network
- IPV4 Address: 10.0.0.0
- Netmask: /8 255.0.0.0
- Click Save

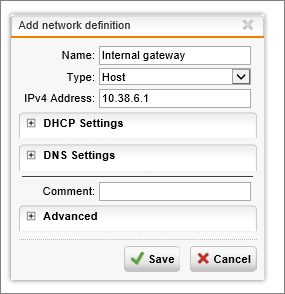
- Click + next to Gateway to create another network definition with the following settings:
- Name: Internal Gateway
- Type: HOST
- IPv4 Address: (your internal subnet’s gateway)
- Click Save
Once this is configured, the internal traffic should now route correctly though the internal interface. Your static routing settings should now look like the following image.

You can use the support tools to check ping and trace route (tracrt).
Step 6.2 - Configure proxy
The next thing that needs to happen is that the proxy functionality needs to be configured.
- Select Web Protection | Web filtering
By default the allowed Network only includes the subnet that the UTM is on.
- Click the folder next to Allowed Networks
- Select and drag the Internal Corporate Network object we created earlier into the Allowed networks Box.
- Next, change the proxy mode from Transparent to Standard Mode
- Click Apply

You are nearly there!
Step 7 - Configure a browser
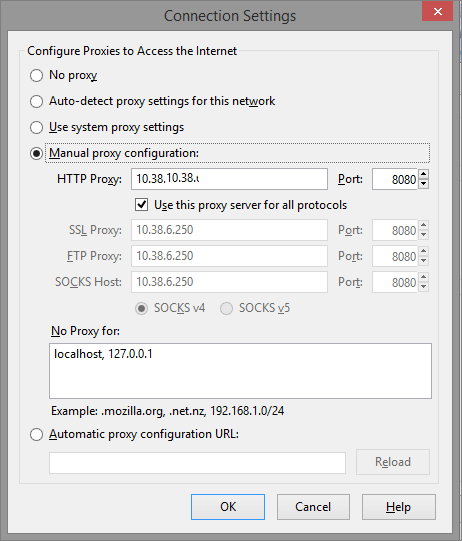
To use the UTM, you need to configure your browser’s proxy settings.
Each browser is slightly different, but all have an option to specify a manual proxy configuration. Specify the Sophos UTM's management IP address and Port 8080
You should be able to surf the Internet from anywhere within your corporate network. URL filtering should also prevent you from accessing sites blocked according to the specified categories.
With your Sophos UTM now configured, it is another great time to take a snapshot of your VM.
Don't Forget Reporting!
With the Web Filtering feature enabled, you now also have a great way of reporting on outbound web access across your organization using Fastvue Sophos Reporter. Just install Sophos Reporter on a new server or VM, add the new server as a syslog server in Logging and Reporting | Log Settings, and select the Web Filtering logs.

You'll start seeing your real time web traffic in a range of dashboards, be able to run detailed Overview and Activity Reports, and configure custom alerts.
Check out the Getting Started guide for more information.
Summary
If you have followed through the guide above, you should now have a fully functional Sophos UTM up and running, and you can start playing with all the other great features such as Application Control, IPS, Remote Access, Web Application Firewall and more.
I hope you have found this guide useful for getting your Sophos UTM basic configuration up and running. If you ran into any issues, please let me know in the comments!
Take Fastvue Reporter for a test drive
Download our FREE 14-day trial, or schedule a demo and we'll show you how it works.
- Share this storyfacebooktwitterlinkedIn
How to Configure Multiple Site-to-Site SSL VPNs with Sophos UTM
Configure a URL Redirect with Sophos UTM's Web Application Firewall