How To Deploy Fastvue Reporter in a High Availability Cluster
by


Etienne Liebetrau
If your Fastvue Reporter server ever encounters a failure or any other form of unplanned or planned downtime, you will not receive the incoming log data during that time, and may lose the ability to report on that period. The high availability of services such as Fastvue Reporter is important for larger enterprises that have a very low tolerance for downtime on any service.
In this guide, I will go through the basic configuration required to deploy Fastvue Reporter in a high availability cluster deployment using Windows Failover Clustering.
We will deploy two nodes that can run the services with only one of the nodes active at a time. Should an active node go down, the failover will be transparent and automated without requiring user assistance. This means that log data will continue to be consumed even during a server failure.
High Availability Cluster Configuration
This guide assumes that you already have the failover cluster up and running and that you have run the Cluster Configuration Validation Wizard. For the purpose of this guide, a simple two-node failover cluster has been configured with a single failover disk (F:).
We will be installing Fastvue Sophos Reporter in this guide, but the steps would be the same for all of the Fastvue Reporter products. The service will be configured as a HA service receiving it its own DHCP assigned Virtual IP address and using a shared failover storage location.
Failover Cluster Node 1 - Fastvue Reporter Installation
Log onto the first node and make sure it is active and that the shared storage is available.
- Download and launch the latest Fastvue Reporter installer for your firewall.
- Select the option to Install Fastvue Reporter, click Next on the Welcome screen and Accept the License Agreement
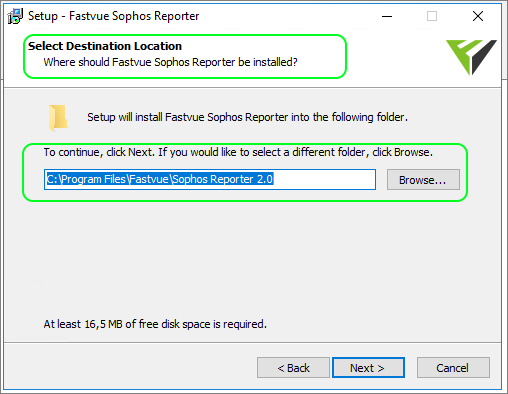
- On the Select Destination Location page, leave the default path of **C:\**Program Files\Fastvue\... then click Next.
- Click Next to do a Full Installation
- Click Next to install to the default website
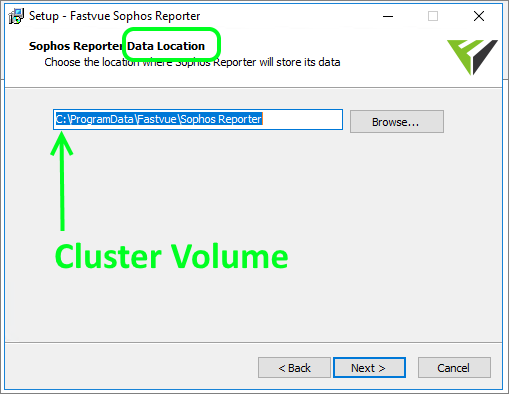
- On the Data Location page change the path to the cluster disk **F:\**ProgramData\Fastvue\...
- Finish the installation
Confirm that Fastvue Reporter is up and running by connecting to http://localhost on the cluster node. This is an important step to verify the success of the installation and start-up of the site and services on the node itself.
Failover Cluster Node 2 - Fastvue Reporter Installation
Log onto the second cluster node. You will need to make it the active node before you continue.
If no services have been specified you can invoke the failover by simply pausing and draining the active node using the Failover Cluster Manager.
- Verify that Node 2 is the active node and check the availability of the shared F:\ drive in File Explorer
- Repeat the installation steps with the same configuration as Node 1
- - Install the application to C:\Program Files\Fastvue\... (i.e. use the default path)
- - Change the Data Location path to F:\ProgramData\Fastvue\... (this will silently overwrite the Node 1 data installation to the share drive)
Once the installation is complete, confirm that Fastvue Reporter is up and running by connecting to http://localhost on Node 2.
At this point in time, you have two nodes configured, each capable of running the Fastvue Reporter service and being able to write to the Data Location. Do not attempt to use the service like this as having two active Fastvue Reporter instances attempting to write to the same data location will cause issues.
Did you know: Fastvue Reporter produces clean, simple, web usage reports using data from your firewall that you can confidently send to department managers and HR team.
Configuring the Fastvue High Availability Cluster Service
Now that the application is installed on both nodes, we can specify it as a cluster service. The clustering will ensure that only one of the nodes owns the cluster resources such as the storage and the virtual IP address. It will also take care of stopping and starting the services during failover. Do the following from either of the cluster nodes:
-
From the Failover Cluster Manager, select Roles | Configure a Role.
-
Select Generic Service as the Role and click Next.

-
Select the Fastvue Reporter service and click Next.

-
Specify the client access point NetBIOS name (this will be the cluster's URL hostname) and click Next.

-
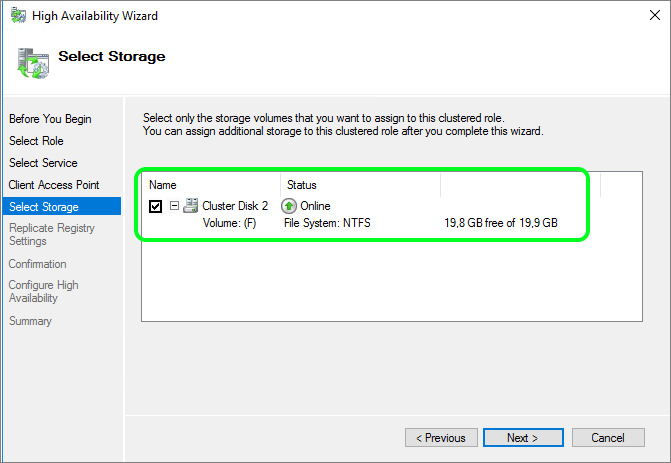
Select the correct cluster disk that contains our data Path (F:\ in our case) and click Next.
-
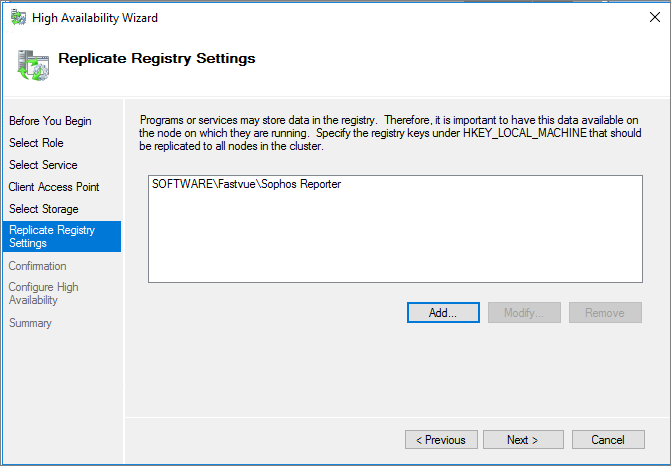
On the Replicate Registry Setting page, specify the registry path SOFTWARE\Fastvue\xxxx Reporter (replace xxxx with your Fastvue Reporter application), click Add... then click Next.
-
Confirm the settings, click Next and Finish the wizard.

-
Confirm that Fastvue Reporter is up and running by connecting to http://clusterIPaddress (replace with the cluster's IP address)


You should notice an error notifying you that your trial period has expired. This is normal as you have switched from running Fastvue as a local service to a cluster service, and the licensing is bound to several factors on the machine, including machine and domain name, and the account running the Fastvue Reporter service.
This is a good time to do some failover testing to see that the service remains up while rebooting the nodes, or manually switching the cluster. If something is not working properly do not activate the licenses yet.
Fastvue Reporter Licensing for High Availability Clusters
To license a cluster, you will need a license key per node, per source. For example, if you are monitoring three firewalls (sources) you will need six license keys and deploy three on each node. Contact your sales representative for additional keys if you need them.
To activate the cluster nodes, complete the following steps:
- Fail the cluster over to Node 1
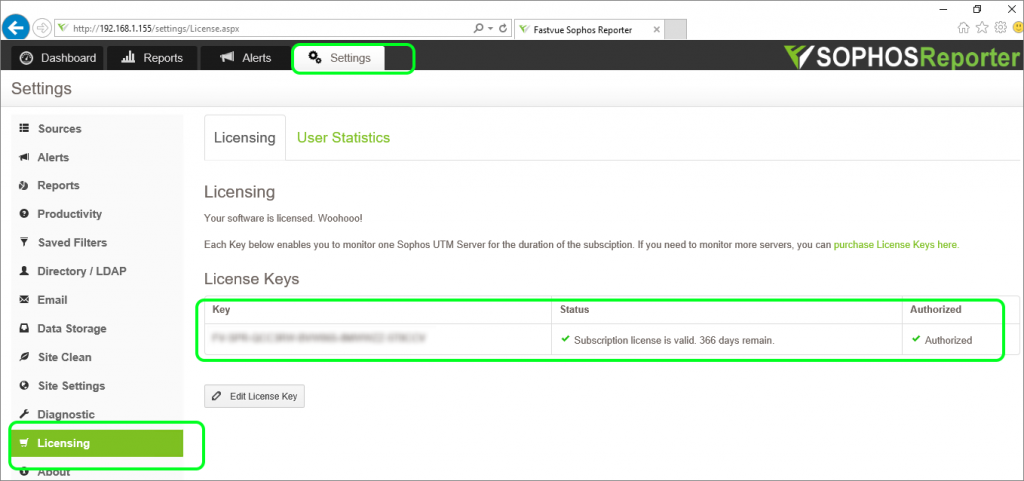
- Go to Setting | Licensing and activate the required number of license keys to monitor your firewalls (sources).
- Fail the cluster over to Node 2 and repeat the license activation using the second set of license keys.
In the end, only one set of license keys will show in the Settings | Licensing.
From this point on all configuration changes to the Fastvue application should be made through the cluster IP address. You do not need to keep track of which node is active. Configuration changes, such as adding an alert and scheduling reports will be synced across the cluster nodes for you.
Changing Fastvue Reporter's Site Settings
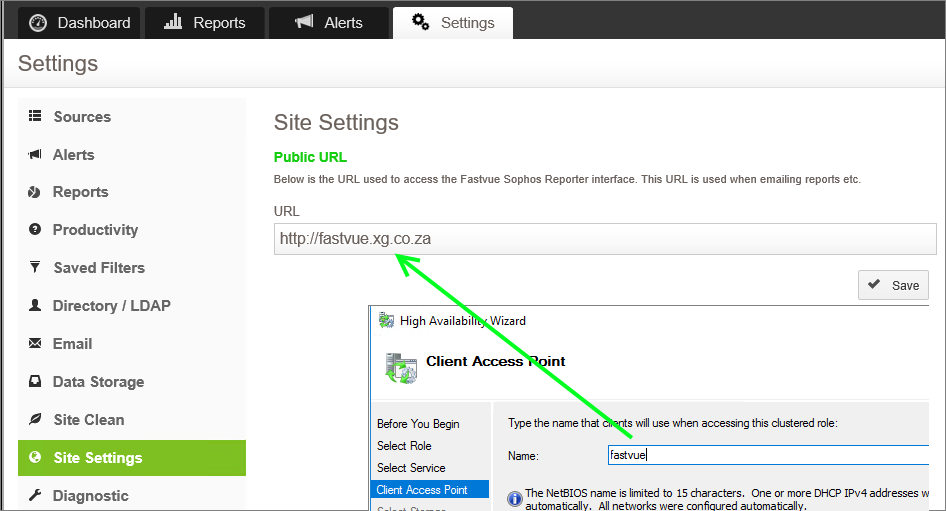
Because you are accessing a clustered application you need to change the site URL from the default server's name to the cluster name we specified during the installation. Typically, you would use the FQDN and just the NetBIOS name.
To change the Fastvue Reporter URL:
- Go to Settings | Site Settings
- Change the URL to the FQDN of the cluster.
- Click Save
This is the URL used to link back to the Fastvue Reporter application from within Report notification emails so make sure the clients receiving reports can correctly resolve this URL to the cluster IP.
High Availability Cluster Behavior
When a failover occurs, the following back-end processes occurs.
- The Fastvue Reporter service is gracefully stopped on the active node - Node 1
- The Virtual IP and storage are released from the active node -Node 1
- The passive node claims the IP and storage - Node 2
- The passive node starts up the Fastvue service - Node 2
It is important to note that the Live Dashboard and Alerts in Fastvue Reporter are cleared during a service restart, and will start rebuilding from that point on. The previous data is still available to be reported on via the Reports tab.
Conclusion
This relatively simple process allows you to deploy Fastvue Reporter in a high availability cluster. Leveraging the Microsoft Failover Cluster technologies, greatly simplifies the process of building a resilient Fastvue Reporter deployment.
This configuration ensures log data is captured, alerted, and reported on through unexpected or expected (such as a patching cycle) outages on a single node. Some of our Fastvue Reporter products import historical log records to fill any gaps in missed syslog data (if this feature is made available by your firewall), but the type of high availability deployment outlined in this article allows for real-time alerts to be sent as they occur.
Take the pain out of reporting on Web Usage and Network Traffic.
Fastvue Reporter produces clean, simple, web usage reports using data from your firewall that you can confidently send to department managers and HR team. Automate reports and get the job of reporting on web usage off your desk and into the hands of people that need it. Download the 30-day free trial today!
Take Fastvue Reporter for a test drive
Download our FREE 14-day trial, or schedule a demo and we'll show you how it works.
- Share this storyfacebooktwitterlinkedIn
How Digital Monitoring for Schools Helps Protect Students Online (2025 Update)
How to Enable Dark Mode in Fortinet FortiGate (FortiOS 7.0)