Reporting on Celestix MSA Threat Management Gateway Appliances
by


Scott Glew
 If you are looking for a world class, turn-key edge security solution, you don't need to look any further than the Celestix MSA Threat Management Gateway appliances.
These appliances run Microsoft Forefront Threat Management Gateway to provide multi-threat protection for your organization. It is therefore simple to integrate Fastvue TMG Reporter and be monitoring, reporting and alerting on your network in a matter of minutes.
If you are unfamiliar with Fastvue TMG Reporter, here's a quick tour video.
If you like what you see, you can be up and running in the next 10 minutes. Just follow this quick guide. We also have a video on our Getting Started page if you prefer.
Step 1: Download Fastvue TMG Reporter
If you haven't already, head to fastvue.co/download to download the 30 day trial of TMG Reporter.
Step 2: Install Fastvue TMG Reporter
The Fastvue TMG Reporter server is responsible for processing the log data from your Celestix MSA TMG Appliance and generating reports and alerts. It also hosts the web based user interface for TMG Reporter that you will use to view reports, live traffic, alerts and so on.
To install Fastvue TMG Reporter you will need a server that meets our minimum requirements. In short, this is a quad core machine with 4GBs of RAM and enough hard drive capacity to store 25% of TMG's log file data. You can read more on our system requirements here.
To install TMG Reporter:
-
Open a Remote Desktop connection to the server you have designated to be the Fastvue TMG Reporter server.
-
Launch the Fastvue TMG Reporter executable you downloaded from the Fastvue website.
-
Click the 'Install Fastvue TMG Reporter' Option

-
On a clean Windows Server, you will be prompted to install .NET 3.5, and then prompted to install and configure IIS. Click yes to both of these prompts.


-
Once .NET 3.5 and IIS have been installed, the TMG Reporter installation wizard will appear.
-
The first page of the wizard (besides the Welcome and License Agreement pages) asks where you want to install the application. The default is C:\Program Files\Fastvue\TMG Reporter. This location will contain the executable files for the background service, and other program files.

-
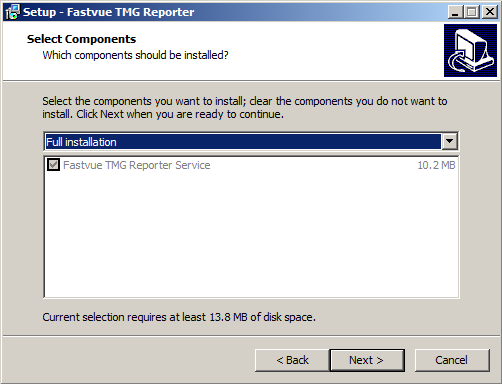
The second page tells you that the Fastvue TMG Reporter Service will be installed. Leave this selected as "Full Installation" and click Next

-
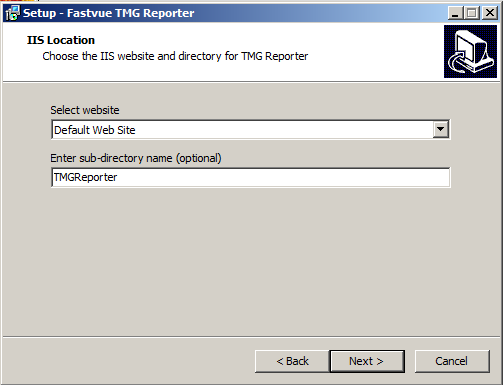
The third page asks what site you would like to install TMG Reporter to. If you are unsure, select Default Web Site and enter TMGReporter as the sub folder name. This means that once installed, you will be able to access TMG Reporter by opening a web browser and browsing to http://yourserverIP/TMGReporter

-
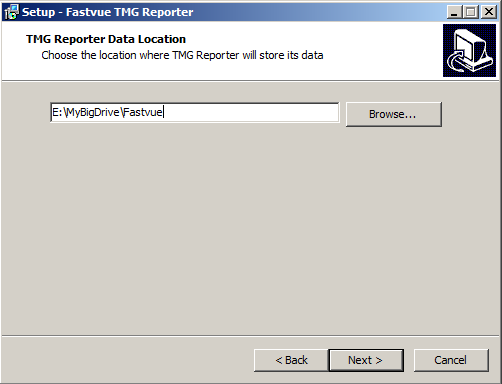
The third page asks you where you would like TMG Reporter to store its data. Specify a location that has enough space to accommodate roughly 25% of your TMG log data. For example, if TMG is logging 1GB per day, allow 250 MB per day in disk space. Note: TMG Reporter has a default data retention policy of 90 days or 50 GB, whatever comes first.

-
Click Finish on the Wizard to install.


Congratulations! You have installed TMG Reporter. You can now go back to your local desktop and browse to http://yourserverIP/TMGReporter to access TMG Reporter.

If you had issues with the installation, have a look at this knowledge base article for the most common issue that tends to arise.
At this point you can click Run in Demo mode to get a feel for the application with some dummy data (view the dashboards, run reports etc).
You will see a very tempting prompt to enter your TMG Server's IP to start monitoring. But for this to work, you first need to install the Fastvue Arbiter on your Celestix MSA Appliance (TMG Server), and add an Access Rule to TMG.
Step 2: Install the Fastvue Arbiter on your Celestix MSA Appliance
The Fastvue Arbiter is a low footprint agent (service) that runs on your Celestix MSA appliance (or any TMG Server). It is responsible for connecting to Forefront TMG's log files securely and passing logged information to the Fastvue TMG Reporter server. This means you do not need top open up network access or file shares on your firewall to access the log files remotely.
Note: If you have configured TMG to log to a remote SQL Server, you do NOT need to install the Arbiter on your TMG Server. Please see our article on remote SQL Server support.
To install the Fastvue Arbiter:
- Open a Remote Desktop Connection to your Celestix MSA Appliance
- Launch the Fastvue TMG Reporter executable you downloaded from the Fastvue website.
- Click the 'Install the Fastvue Arbiter' Option and proceed through the wizard using the default settings.

Once installed, you will notice there is a new service running called Fastvue Arbiter. There is also a new application called Fastvue Arbiter Settings. This application lets you specify where TMG's log files are stored. You ONLY need to do this if TMG is logging to W3C text logs AND you have changed the logging location from the default (C:\Program Files\Microsoft Forefront Threat Management Gateway\Logs). Otherwise, log out of your TMG Server and proceed to the next step.

Step 4: Add a Fastvue Access Rule to TMG
The Fastvue Arbiter and the Fastvue TMG Reporter server communicate on port 49361, Unless you have some very lenient firewall policies, chances are this communication will be blocked by your TMG Server.
You therefore need to add an Access Rule to TMG to allow access between the Arbiter and TMG Reporter. Simply put, this rule should allow port TCP port 49361 from the TMG Reporter server to Localhost (the TMG Server) for all users.
Here are the steps to add the rule. You can also watch a video on adding this rule.
- Open Forefront TMG’s Management Console
- Select Firewall Policy on the left hand side
- Click Create Access Rule on the right hand side. This launches the Access Rule wizard.
- Give the access rule the name Fastvue.
- Select Allow as the Rule Action.
- Select Selected Protocols from the drop down list and click Add…
- Click New… | Protocol on the tool bar. This launches the new Protocol Definition Wizard.
- Call the Protocol Fastvue
- On the Primary Connection Information page click New… and select:
- Protocol Type: TCP
- Direction: Outbound
- From: 49361
- To: 49361
- Click OK and click Next.
- Select No on to Use secondary connections
- Click Finish to add the protocol
- Expand the User-Defined folder, select the new Fastvue protocol and click Add.
- Back on the Access Rule Wizard, click Next.
- On the Access Rule Sources page click Add…
- Click New… | Computer on the toolbar
- Enter the name TMG Reporter and enter the IP address of the TMG Reporter Server. Click OK.
- Expand the Computers folder and select the newly added TMG Reporter computer. Click Add.
- Back on the Access Rule Wizard, click Next.
- On the Access Rule Destinations wizard, click Add…
- Expand the Networks folder and select Localhost then click Add.
- Back on the Access Rule Wizard, click Next.
- On the User Sets page, leave ‘All Users’ in the list and click Next.
- Click Finish to add the rule.

Add the Celestix MSA appliance as a Source
Now that you have installed Fastvue TMG Reporter, the Fastvue Arbiter and added your Access Rule, you are ready to start monitoring and reporting!
-
Simply go back to your local desktop and open your favorite browser (for best results use the latest version - do NOT use IE8 or below)
-
Browse to the TMG Reporter site (e.g. http://yourserverIP/TMGReporter).
-
If the Start screen is displayed, just enter your TMG Server's IP address or DNS name and click Go.
-
If the Start screen is not displayed, go to Settings | Sources (the Start screen will not be displayed in you're running in demo mode or if you have already added a source). Click Add Source and enter your TMG Server's IP address (or DNS name). You should soon see records being imported into the newly added source.


-
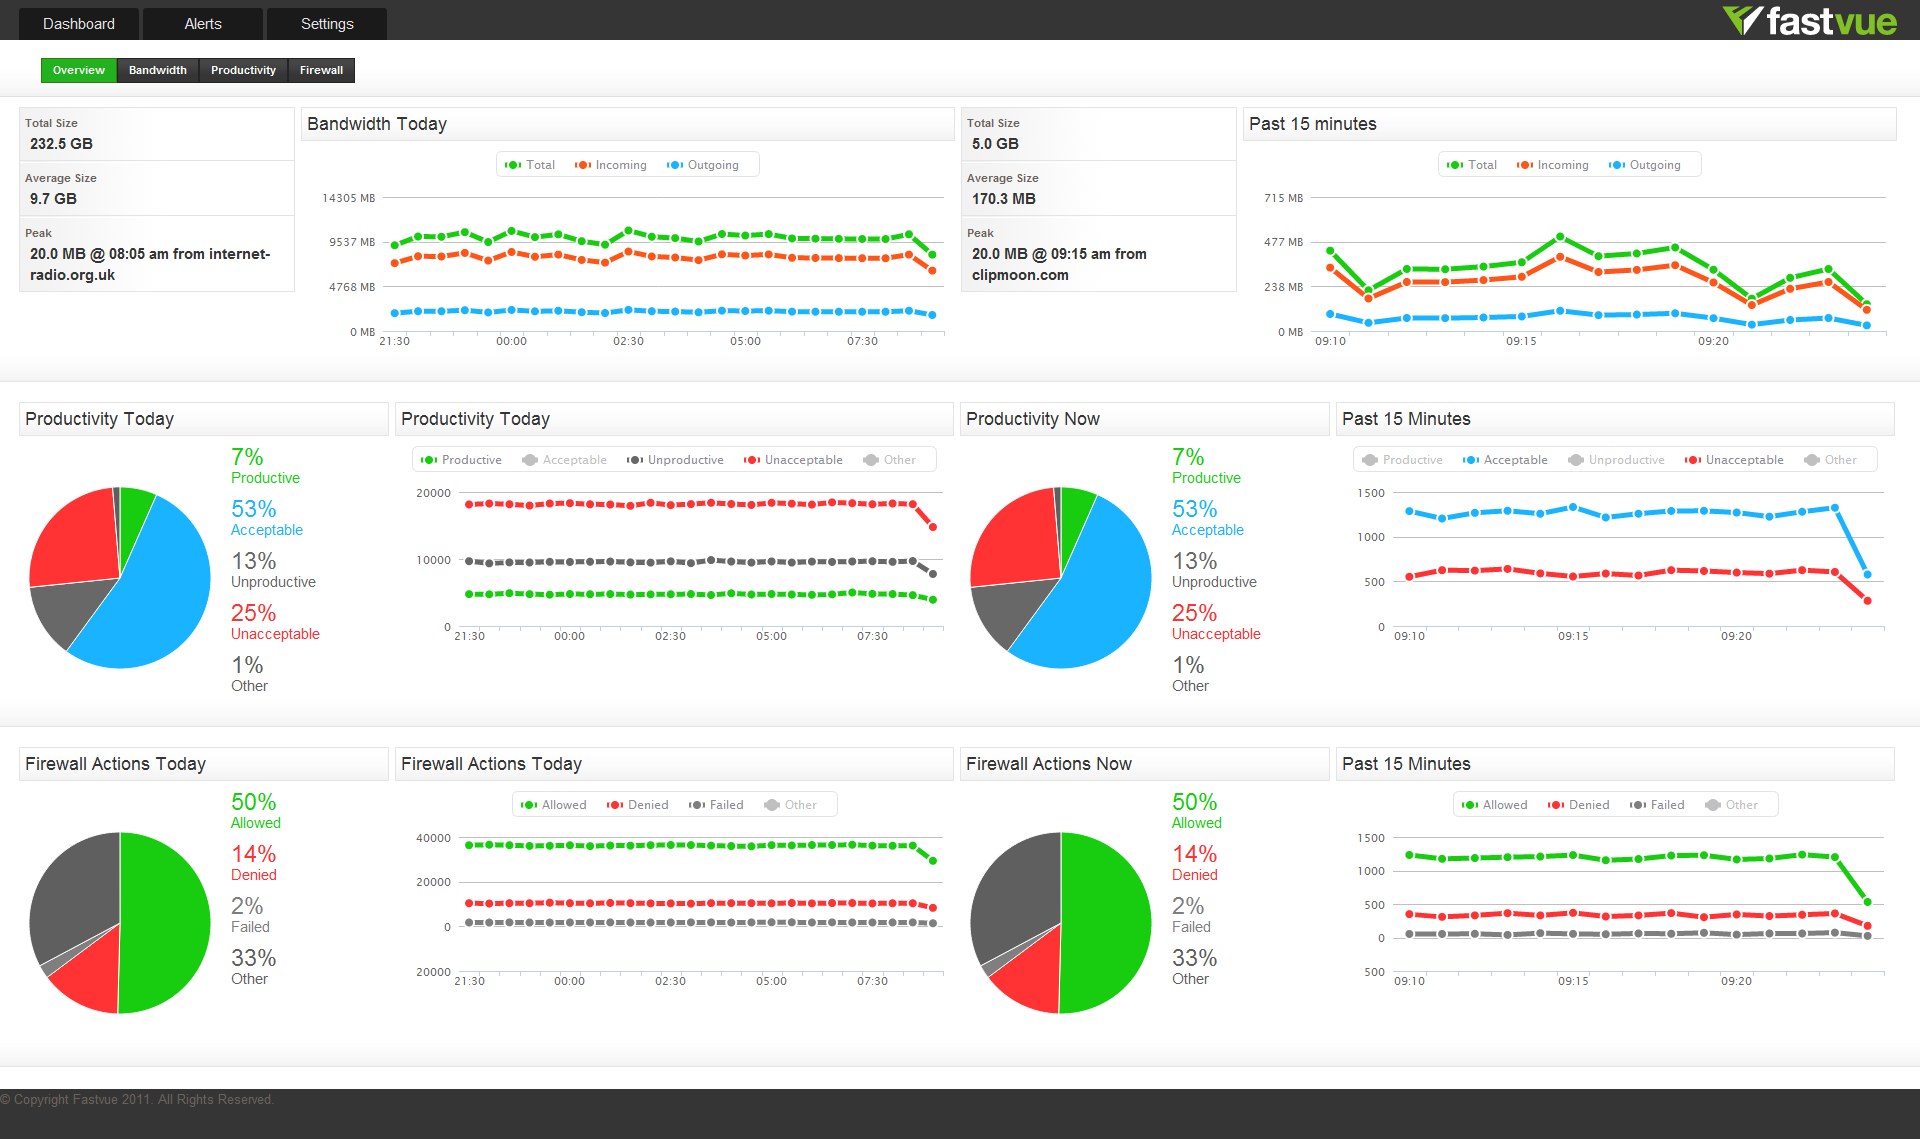
You can then go to the Dashboard tab and view your network data in real time, and start running Company Overview and User Investigation reports on the Reports Tab.


Enjoy!
At this point you should be successfully monitoring, reporting and alerting on your Celestix MSA TMG Appliance. If you have had any trouble along the way, please head to our Support Center to browse our Knowledge base or contact us directly. We will happily help you get up and running!
Take Fastvue Reporter for a test drive
Download our FREE 14-day trial, or schedule a demo and we'll show you how it works.
- Share this storyfacebooktwitterlinkedIn
Logging Improvements in Forefront TMG 2010
How to Configure Forefront TMG Malware Alerts