Setup a Sophos UTM SSL VPN In 7 Simple Steps!
by


Ethan Mecham
One of the great benefits deploying Sophos UTM in your home network is the ability to configure a VPN with incredible ease. For those that are unfamiliar, a VPN (stands for Virtual Private Network) enables you to access your home network from anywhere in the world as long as you have an internet connection.
This can be useful for many reasons. Here are a few:
VPN Benefits
- The ability to access internal devices at home without opening up your firewall (Remote Desktop or VNC, for example)
- Encrypting your traffic so it cannot be intercepted and manipulated (While in an airport or a coffee shop, for example)
- Making your online presence appear in a location other than your current one (Some use this to access Netflix and other services from outside the U.S.)
There are many different types of VPNs (IPSec, L2TP over IPSec, PPTP etc), where the difference is encryption patterns. Here I'll explain how to set up an SSL VPN specifically.
SSL VPN Benefits
SSL VPNs are not necessarily the most secure of the aforementioned options, but it is more than sufficient for home use. One benefit that makes an SSL VPN especially useful is the convenience of availability.
Most VPN encryption protocols require specific ports to be open in order to work. For example, if you're at work and try to connect to a PPTP VPN, it won't work because your company has not opened up port 1723 (the port PPTP uses) on their network. Generally, enterprises will not poke holes in their firewall for you to access an external VPN.
SSL VPN uses port 443 for encryption just like all secure websites (those with "https://" in front of them). The only way to block an SSL VPN is to block port 443, and considering that more and more websites are using this port for secure transfer, it is not likely to be blocked.
This guide takes you through setting up a Sophos UTM SSL VPN in 7 simple steps!
Step 1. Set up Users
If you haven't already set up users on your network, you will need to implement at least one. You will use this user to access the User Portal, which will be discussed later.

As you can see, I create two users for this purpose. This simplifies configuration on the client end. Configure "lanssl" as a user, and "wanssl" as another user. These names will come to make sense in step 2.
Step 2. Configure SSL VPN
Here we will configure the actual Sophos UTM SSL VPN service. We will create two profiles where each of the previous two users (lanssl, and wanssl) will be used. "lanssl" will be the profile used to simply access devices on our local network from an external location. "wanssl" will be used to access our local network, plus the Internet through our SSL VPN.
Here are the reasons we have both:
Lanssl purposes:
- Connect only to our local network
- Do not backhaul web browsing traffic through Sophos UTM (this will not fulfil the purpose of encrypting Internet traffic)
Wanssl purposes:
- Change online presence to the location of our Sophos UTM
- Encrypt all web browsing through Sophos UTM in public locations (this will slow browsing depending on your speeds)
- Access services like Netflix outside of U.S.
*If you don't wish to have two different types of VPNs, then you can simply enter a user here. For example, I could drag "Ethan" into "Users and Groups" and log in remotely using my user credentials. You could then omit the creation of "lanssl" and "wanssl" as users.
Configure "lanssl":

The networks placed into the Local Network box will be made available to the current profile being configured. So here we simply select our Internal network.
Configure "wanssl":

Here we place "Any" into the Local Network box. This tells the profile to take all traffic back through the Sophos UTM.
*On both configurations ensure the Automatic Firewall Rules option is selected.
Step 3. Configure Masquerading Rule
A masquerading rule simply takes your private IP addresses that you use on your local network and disguises or masquerades them behind your public IP address.
To configure the rule:
- Go to Network Protection | NAT
- Under Masquerading select New Masquerading Rule...
- Set Network to Any and Interface to External (WAN)

Step 4. Configure DNS
When clients are connected to the VPN, they need to know which DNS server to use in order to resolve host names.
- Select Remote Access | Advanced.
- Specify the IP of your UTM if it is used as your DNS server, or you specify another DNS server such as Google's. In the screenshot below I use Google's DNS server.

Step 5. Configure The User Portal
The User Portal is a website that Sophos UTM hosts, where users can sign in and access services such as Remote Access.
To configure the User Portal:
- Go to the Management | User Portal menu and toggle it on.
- Once enabled, select 'Any' as the networks you would like to have access to the user portal.
- If you would like to change the port of the user portal site, you can do so under the advanced tab. It is hosted on port 443 by default.

Step 6. Set Up Dynamic DNS Name
One important factor when using a VPN is that your device knows where to locate your VPN Server from a global perspective. In order for your UTM to configure the VPN profile correctly, it needs to know a "name" for your external IP address. The easiest way to do this is to configure a Dynamic DNS name. Read Etienne's post on How to Configure Dynamic DNS on Sophos UTM for a quick walkthrough on how to set this up.
When you download the VPN profile from Sophos UTM's User Portal (see below), it will include the UTM's Dynamic DNS name, so that your clients can connect to the UTM from anywhere!
Step 7. Configure Clients
Now that the Sophos UTM's SSL VPN settings are configured, lets configure some clients to access the VPN.
We will configure three different clients.
- Mac OS X using TunnelBlick.
- iOS using OpenVPN,
- Windows 7 using the provided software.
Step 7a. Mac OS X Configuration
To access your Sophos UTM's SSL VPN from Mac OSX:
- First, download TunnelBlick and install it. Tunnelblick is a free, open source graphic user interface for OpenVPN on OS X
- Access the User Portal from anywhere by using the Dynamic DNS name configured in step 6. For example, if the name I configured was "test.ddns.net", I would type in: https://test.ddns.net
- Once on the webpage (you'll notice it looks very similar to the WebAdmin page), login with the lanssl user account. You will then see this page:
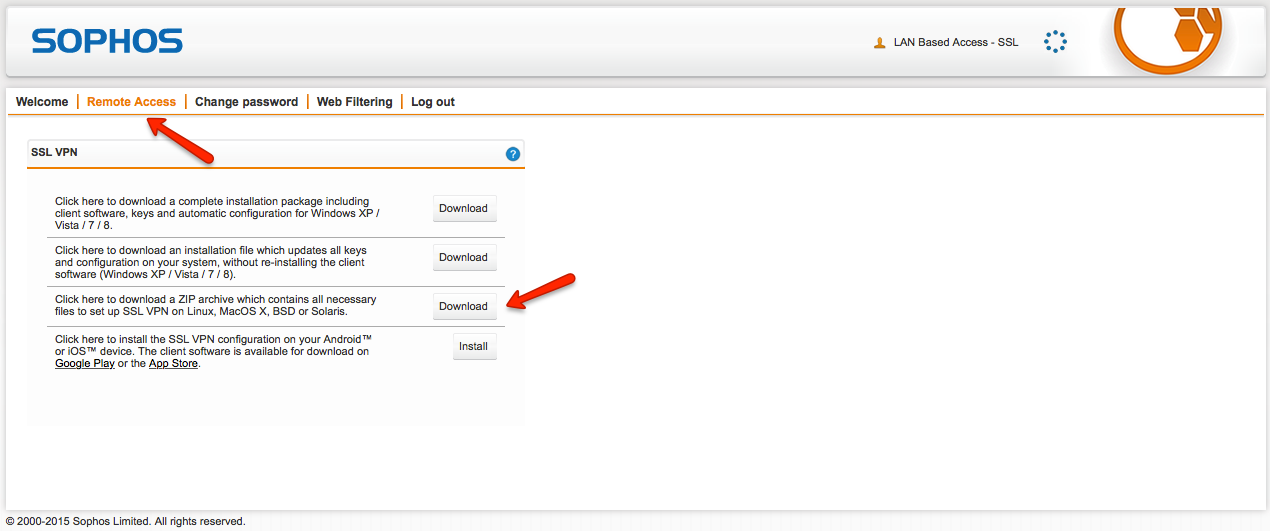
- On the Remote Access tab, click the third option to Download the ZIP archive for Mac OS X and Linux.
- Extract the zip to reveal the file with an extension of ".ovpn".
- Double-click this file and it will ask you to import it into TunnelBlick. Click Connect, enter your credentials for lanssl and you will be connected to your VPN!
*The process is identical for the wanssl profile and will simply show up as a second option in TunnelBlick once imported.
Step 7b. iOS Configuration
To access your Sophos UTM's SSL VPN from an iOS device (iPhone/iPad):
- First, download the free OpenVPN app from the App Store.
- Again, access the User Portal as in step 2 of Step 7a.
- This time, select the fourth install option to configure Android and iOS. You will be presented with this page:
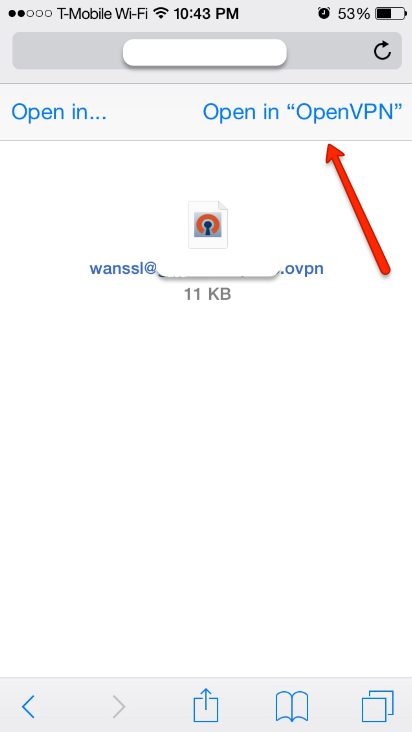
Select the Open in OpenVPN button.

Select the + icon to import the VPN profile. Enter your credentials for the required username profile (depending on if you want to only access Internal devices, or backhaul all Internet traffic through the UTM as well) and you will be connected.
Step 7c. Windows Configuration
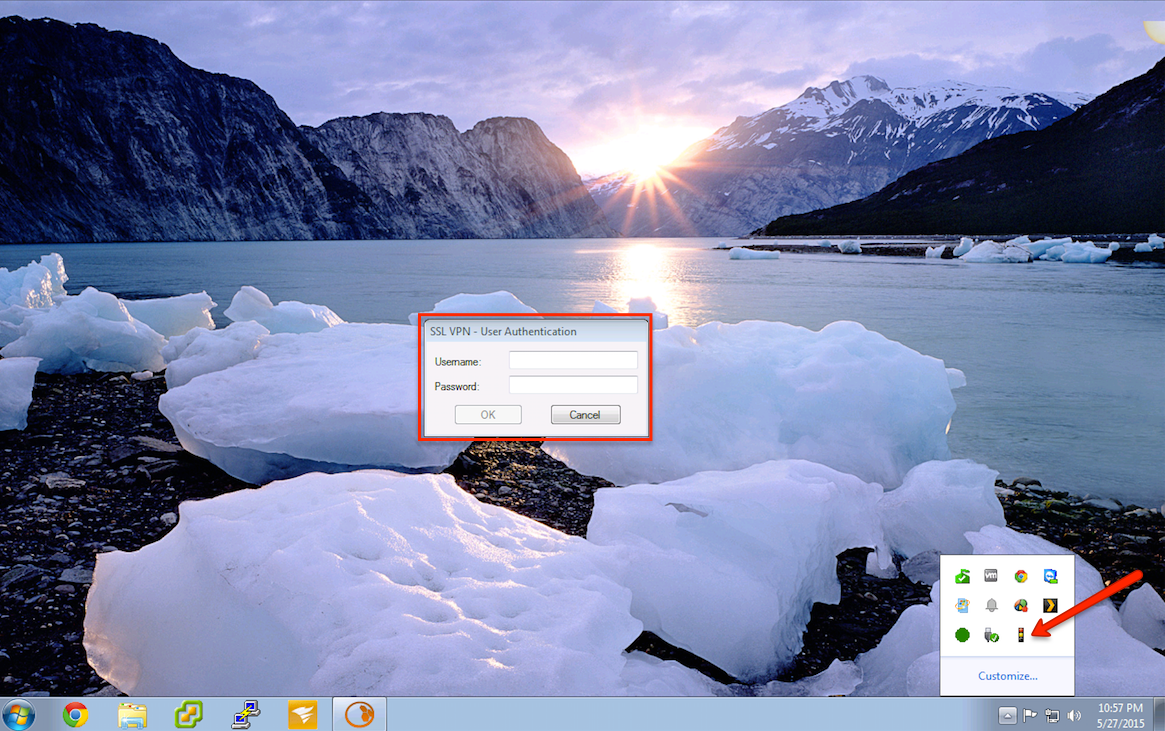
Windows configuration is so simple that all you need to do is select the first download option from the UTM's User Portal to install the software. After it is installed, right-click the traffic light in the bottom right hand corner of your screen and click Connect.
Conclusion:
I hope this post has been helpful for those wanting to set up a home Sophos UTM SSL VPN quickly and easily. If configured correctly, you should now have successfully set up your own VPN service and have the conveniences that come with it.
If you have any questions or comments, please post below!
Take Fastvue Reporter for a test drive
Download our FREE 14-day trial, or schedule a demo and we'll show you how it works.
- Share this storyfacebooktwitterlinkedIn
How to Configure Multiple Site-to-Site SSL VPNs with Sophos UTM
Configure a URL Redirect with Sophos UTM's Web Application Firewall