Everything You Need to Know About Storing Data in Fastvue Reporter

by

Scott Glew
Fastvue Reporter imports log data (a lot of log data!) from your firewall into its own database. This database can grow significantly over time, especially if you're monitoring many firewalls handling a lot of traffic.
This article will walk you through everything you need to know about storing and managing data in Fastvue Reporter.
How much data storage will you need?
Every organization is different, and it only takes a particularly chatty application to drastically change the log data generated between two similarly sized networks. However, when getting started, a good rule of thumb is to allocate enough disk space to store 15 MB per user per day.
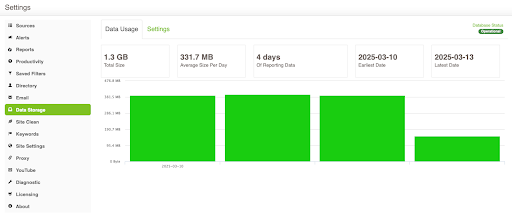
Once the software has been importing data for a few days, head to Settings > Data Storage. Here, you will see how much data has actually been imported per day, along with a Daily Average figure.

Where does Fastvue Reporter store data?
Fastvue Reporter’s data storage location can be found in Settings > Data Storage. This location stores all of Fastvue Reporter’s configuration files, generated reports, and the database.
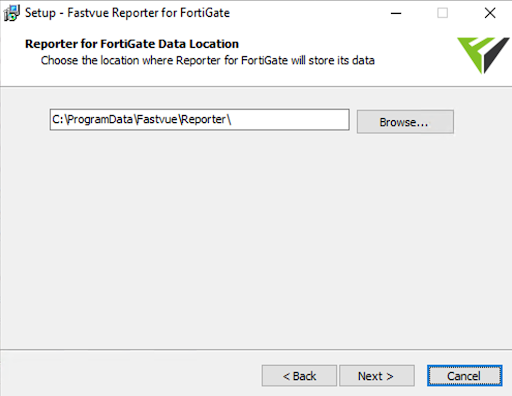
This location is specified during installation. For Windows, it is specified on the Data Location page of the installation wizard.

For Linux/Docker, it is specified in your Docker Compose file (docker-compose.yml) or directly in your docker run command and looks something like this:/path/on/hostmachine:/data
E.g./opt/fastvue/reporter:/data
Adjusting the Data Retention policy
To avoid filling up your drives, Fastvue Reporter will start deleting data once it is 90 days old, or if 90% of the available drive space (at the time of installation) is filled, but these settings can be easily adjusted in Settings > Data Storage > Settings.
Try increasing the Number of days policy from the default 90 to the number of days you want to store. You'll notice the estimate underneath the edit box changes to show you the amount of hard drive space you need to allow based on the Daily Average so far.

Likewise, you can change the Size policy to see an estimate of the number of days it will accommodate.

Receiving Low Disk Space Notifications
Fastvue Reporter automatically deletes old log data from the database based on its Data Retention Policy, but it doesn’t manage all the other files stored in the Data Location.
Even though the log database is kept under control, other files, like reports, still take up space, which tends to accumulate over time, particularly if you are regularly generating large reports. While, for example, Overview Reports are only around 1 MB each, an Activity Report on one user for one day may be 50 MB.
To prevent issues, Fastvue Reporter monitors disk space and alerts you when space is low. There are two types of low disk space notifications:
Low Space Warning: This alert triggers at 15% available disk space. A notification is sent, but data import continues.
Low Space Critical: This alert triggers at 5% available disk space. A notification is sent, and data import stops to prevent issues.
These alerts are sent to the email address configured in Settings > Email > System Notifications.
Configuring Disk Space Notification Thresholds
Unfortunately, there is no user interface to modify these thresholds, but you can adjust them by editing the Settings.xml file while Fastvue Reporter is not running.
To modify these thresholds:
Navigate to Settings > Data Storage > Settings and note the Data Storage location
Stop Fastvue Reporter by stopping the Fastvue Reporter service (Windows) or stopping the Fastvue Reporter container (Linux / Docker), as you cannot edit this file while running.
Navigate to the Data Storage location on your server and open the Settings.xml file in a text editor.
Locate and modify the following settings:
<Item Name="DiskSpaceStorageLowSpaceWarning" Type="System.String, mscorlib" Value="15%" /> <Item Name="DiskSpaceStorageLowSpaceCritical" Type="System.String, mscorlib" Value="5%" />Adjust the Values as needed, either as percentages or fixed sizes (specified in bytes), based on your storage requirements.
Save the Settings.xml file and restart the Fastvue Reporter service (Windows) or the Fastvue Reporter container (Linux / Docker).
For example, if you have a 100 GB disk, and you set the DiskSpaceStorageLowSpaceWarning setting to 10%, you will receive an alert when Fastvue Reporter’s data location reaches 90 GB. Alternatively, you could specify 96636764160 as the value for the same result (90 GB in bytes).
You may also notice the following two similar settings in the Settings file (notice the word ‘Database’ instead of ‘Storage’)
Changing the Data Storage Location
You may have noticed that you cannot change Fastvue Reporter’s data location in Settings > Data Storage > Settings. However, it can be moved using the process below.
Windows:
Go to Settings > Data Storage and note your current data location.
Stop the Fastvue Reporter service using
services.msc.Copy the entire data location to the new location using Windows Explorer.
Run the Fastvue Reporter installer (download the latest version from the website if needed).
In the installer wizard, specify the new Data Location.
Complete the installation process.
Open the Fastvue Reporter website and clear the browser cache (Ctrl + F5 on Windows, Cmd + R on Mac).
Linux / Docker:
When you created the Fastvue Reporter container, you mapped a data location on the host machine to a /data folder inside the container. This was specified in your Docker Compose file (docker-compose.yml) or directly via the Docker run command and looks something like this:/path/on/hostmachine:/data
E.g./opt/fastvue/reporter:/data
To move the data storage location:
Stop the Fastvue Reporter container
Copy the data location to your new desired location.
Update your Docker Compose file or your Docker run command to use the new path on the host.
Start the Fastvue Reporter container.
Fastvue Reporter will now use the new location, ensuring that all data and settings remain intact. Log imports will resume from where they left off.
Data Storage Performance Tips
Use SSDs
Fastvue Reporter uses either Elasticsearch or Open Search (a fork of Elasticsearch) as its database. This is I/O intensive and has considerable performance benefits when running on SSD disks. Fastvue recommends SSD disks to avoid performance-related issues, especially when monitoring medium to large networks.
Use Local Drives
We don't advise installing to a network drive due to latency issues affecting the stability of our very frequent read-write operations.
However, if you must use a remote drive
Use a UNC path instead of a mapped drive (e.g.,
\\myserver\fastvuereporterinstead ofX:\fastvuereporter).Ensure the machine account for the Fastvue Reporter server has read/write permissions to the UNC path. For example, if the Fastvue Reporter machine is
mywebserverin themydomaindomain, set permissions formydomain\mywebserver$.
Fastvue Support: We're Here to Help!
Just like that one guy in every horror movie who confidently says, "Don't worry, I’ll check it out!" … only to disappear five minutes later.
But don’t worry, we actually come back with answers 😆. Find us here.
Have another question?
Got another question? We're here to help. Visit our support section for more information.
- Share this storyfacebooktwitterlinkedIn

