How to Use Sophos UTM Uplink Balancing to Achieve ISP Redundancy
by


Etienne Liebetrau
Providing Internet access to your company’s users is no longer just a nice to have. The modern cloud-enabled world means that we need to be connected to use the systems that drive our businesses. Continuous Internet access is not just important - it is now critical.
Using more than one Internet Service Provider (ISP) is a key metric when it comes to Business Continuity Planning and Disaster Recovery. No matter how good an ISP claims to be, they can all suffer from outages. If you have a backup ISP that uses significantly different infrastructure, you can protect yourself from Internet blackout. Significantly different in this context implies the connection medium, say Metro-Fibre compared to Satellite or 3G or multiple cheap consumer grade ADSL connections.
Sophos UTM has the capability of seamlessly providing ISP redundancy. The term it uses for this functionality is Uplink balancing.
Implementing ISP Redundancy with Sophos UTM
Like most other features of the UTM, uplink balancing is simple and easy configure, but also allows granular control over the settings should you wish to tweak them.
In this article, I will step through the basics of configuring ISP redundancy / uplink balancing on Sophos UTM, and then dive into more detail to cover typical deployments.
The first thing you will need is a second Internet connection. This would typically be a secondary Internet router such as a second DSL line that you can patch into one of the UTM's physical interfaces.
Configuring Uplink Balancing
- Connect your second Internet connection to your Sophos UTM on an unused interface
- Open Interfaces and Routing | Interfaces | + New Interface
- Specify a name
- Type : Ethernet
- Hardware : The interface you connected to
- Static or Dynamic IP
- Check the box for IPv4 Default GW

The IPv4 Default GW setting is very important. Specifying multiple connections as a default gateway enables uplink balancing. This is exactly what we want, so go ahead and confirm with OK
- The link will be created but will be turned off by default.
- Locate your new interface and turn it on with the toggle switch
- Wait a minute for it to initialize and you are done!

That’s all there is to configuring basic uplink balancing. If you have an environment where your two connections are equal, you do not have to configure anything else. But since this would rarely be the case, let's dive in to some of the more granular settings.
Adjusting Uplink Balancing
By default, both links are rated equal and the same number of connections are balanced across each of them. You can influence this by configuring the uplink balancing scheduler.
Active Interfaces Scheduler
- Open Interfaces & Routing | Uplink balancing | Active interfaces
- Click the grey tool icon
- You can now specify different relative weights for each interface
- You can also specify a persistence duration based on the source address (more on persistence below)

In the image above, you can see that I have set the weight in a 2:1 ratio and reduced the Persistence timeout down to 15 minutes.
Active and Standby Configuration
Having two active, weighted interfaces is great for a number or reasons, but you might not always want this. Fortunately, Sophos UTM also allows you to specify active and standby interfaces.
Sophos UTM uses link monitors to detect if the active link has failed. If a failure is detected, then the standby link is activated and traffic is routed over it. The UTM continues to monitor the Primary link to see if it comes back up again. When it does, it puts the standby link back into standby.
To configure active and standby interfaces:
- Open Interfaces & Routing | Uplink balancing | Active interfaces
- Delete the standby link from Active Interfaces
- Browse and add the standby link to Standby Interfaces

You can verify that setting are working by checking the Interfaces screen. You will notice that the standby link goes from UP to DOWN. If you simulate a failure on the active link you will see that it automatically sets the standby link to UP and takes it DOWN when it is no longer required.

Multipath Rules
Multipath Rules only apply to the implementation where multiple active uplinks are used. To explain what multipath rules are, we need to have a look at the default persistence behavior.
The source address is used to set persistence. This means that all traffic originating from an IP will persist over a single link. This will be re-evaluated after the persistence duration specified in the balancing scheduler.
Multipath rules allow you to change this behavior, and allow more than one link to be used by a single source address. You still want persistence, but you want it to be more dynamic.
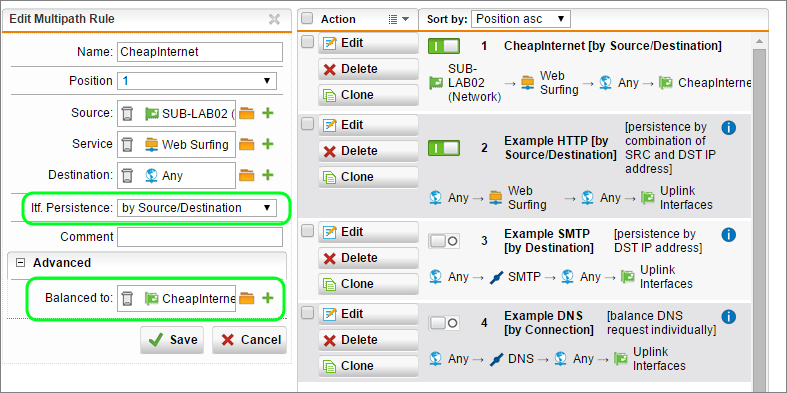
Let’s have a look at the example HTTP by Source/Destination Rule. They key here is to look at the itf. Persistence (Interface Persistence) field

This show us that persistence is based on the Source and Destination. This allows the client to actively use both Internet links, but it is smart enough to persist active connections over the same link.
Getting Creative with Multipath Rules
As you can see, Multipath rules enable more granular control over how the links are used, and you can get very creative with this. For example, let's say we have a remote site on a RED device and we only want to give them Internet access over our cheap ADSL link.
- Open Interfaces & Routing | Interfaces | Multipath rules
- Click +New Multipath rule
- Source : our RED network
- Service : Web Surfing
- Destination : Any
- Itf. Persistence : by interface
- Bind interface : the "cheap ADSL" interface
- In the Advanced Section, check the box for Skip rule on interface error
- Save

This is great, but let’s say we want to scale this up over multiple cheap ADSL connections:
Create an Interface Group
- Open Interfaces & Routing | Interfaces |Interfaces
- Click + New Interface
- Specify a name
- Type: Group
- Drag the relevant cheap ADSL interfaces into the Interfaces box
- Save
Create a Multipath rule to use your group
- Open Interfaces & Routing | Interfaces | Multipath rules
- Click +New Multipath rule
- Source : our RED network
- Service : Web Surfing
- Destination : Any
- itf. Persistence : by Source/Destination
- In the Advanced Section, change Balanced to: The group we created earlier
- Save
Conclusion
There's no question that ISP redundancy is important. If you try to achieve this using the wrong network layer, equipment, or device configuration, you can end up with a complicated routing mess that does not balance effectively.
By making use of Uplink balancing on Sophos UTM, you can leverage the full layer 7 functionality of the UTM to make routing and balancing decisions based on your criteria, and the health of your links.
Take Fastvue Reporter for a test drive
Download our FREE 30-day trial, or schedule a demo and we'll show you how it works.
- Share this storyfacebooktwitterlinkedIn
How to Configure Multiple Site-to-Site SSL VPNs with Sophos UTM
Configure a URL Redirect with Sophos UTM's Web Application Firewall